
Inground Swimmig Pool Kit Wall Installation
The inground swimming pool kit wall installation is one of the most important steps when building your own DIY pool kit!
Please make sure that to wear gloves when handling steel panels and components during your inground swimming pool kit wall installation. Safety first! Make sure to start the installation by laying out all pool kit wall panels on the panel shelf. Place a pool wall brace and necessary bolts (depending on the brand of pool wall panel) at every panel joint, as indicated in the Swimming Pool Layout and Pool Kit Dig Dimension Drawing supplied to you by Pool Warehouse after your purchase.
Starting in the appropriate place for the shape of the swimming pool kit being built (see pg. 9), fasten all pool kit wall panels and wall braces together using the supplied bolts. Align the swimming pool wall panel joints for a tight fit and hand tighten (snug) the supplied non-corrosive bolts. MAKE SURE THAT YOU DO NOT OVER TIGHTEN!!

Positioning The Pool Skimmer
Most inground swimming pool kit wall panels are available with pre cut holes for most commonly used pool skimmers. Position the skimmer panel according to the following steps:
- Pool Skimmer’s should always be placed on the long swimming pool wall, with prevailing winds blowing into the skimmer.
- If you are building a hopper style swimming pool, locate the pools skimmer as per supplied drawing.
- Insure the pool kit skimmer panel will be clear of the wall-mounted safety-rope anchors.
- Locate pool returns on walls opposite the skimmer, to push surface debris towards the skimmer.
- Aqua Genies skimmers do not require additional returns, see the Aqua Genie Manual for details.
Step 1 – Rectangular Inground Swimming Pool Kits Only
Begin in a shallow-end corner. In 4’ radius pools, start by bolting the two corner pool wall panels together, with a brace offset panel joint. Then connect the corner pool wall panel assembly to an end-wall straight panel, with a brace offset from the flanges (see figure 8). Continue to assemble the pool wall panels and braces according to the pool kit layout spec sheet and Dig Dimension Drawing. If steps are present, determine their location before starting panel assembly and complete the step installation process when you reach their position.

Step 1 – Oval Inground Swimming Pool Kits
Begin at a straight side wall and bolt the straight pool kit wall panels and braces together. Repeat this process for the other straight sidewall. Square both sidewalls by measuring diagonally across the swimming pool at both the top and the bottom of the panels. Drive stakes a few inches into the ground at the ends of the straight sections to hold them in place. Begin to assemble the radius ends. Bolt the curved wall panels and braces to the end of a straight sidewall. If required, use 5° wedges (see Figure 9) to adjust the radius, as indicated in the Pool Kit Layout and Dig Dimension Drawing. Continue to assemble pool kit panels and braces according to the Swimming Pool Kit Layout and Dig Dimension Drawing. If steps are present, determine their location before starting the pool wall panel assembly and complete the step-installation process when you reach their position. Insure the radius is true by driving a stake halfway between the sidewalls, stretching a tape measure from the stake to the radius panels, and checking the distance at various points on the curve. All measurements should be the same. If not, slightly shift the curved panels until a constant radius is achieved.
Inground Swimming Pool Kit Step or Swim Out/Cozy Cove Installation
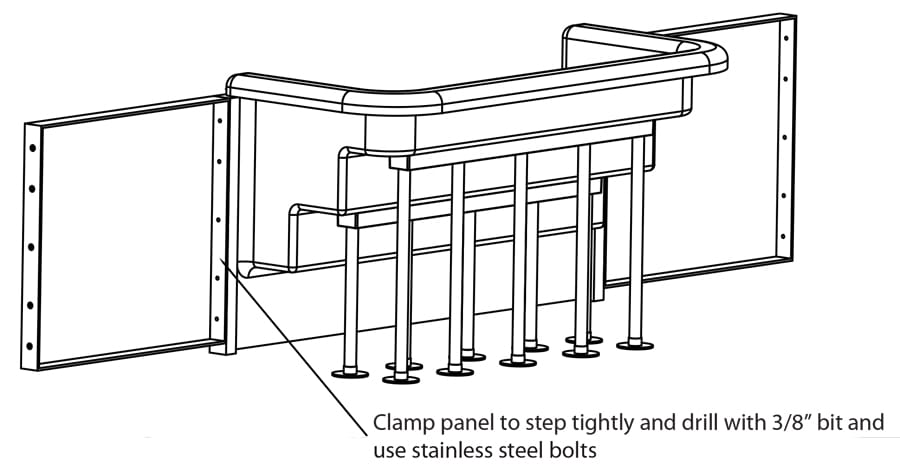
Inground swimming pool kit steps and swim outs are installed in the same manner. Start by setting the swimming pool step in the excavated area according to the Swimming Pool Layout and Dig Dimension Drawing. Use supplied pool step support system. With the step in place, clamp the neighboring pool kit wall panel to the swimming pool step, insuring that the face of the step is flush with the pool wall panel and that the top of the panel is flush with the bottom of the pool step coping-receptor nose. With the pool wall panel and step clamped tightly together, drill 3/8″ holes through the panel holes into the pool step flange. Use stainless-steel bolts to secure the panels/braces to the pool step.
Installing Aluminum Swimming Pool Kit Coping
Two types of swimming pool kit coping are provided with our swimming pool kit systems, straight and pre-shaped. Start by installing all pre-shaped pool kit coping; this includes 6″, 2′, 4′ and 9′ radius, Roman End, 45 degree, True L and Lazy L coping. Start by positioning the pre-shaped pool kit coping on the appropriate panels, insuring that the coping lip fits snugly against the face plate. Using the self-tapping screws, secure the pre-shaped pool coping to the pool kit wall panels, starting at the ends of each piece of coping and continuing every 12” along the length of the pool coping. Next install the straight coping to the panels using self taping screws provided. When installing the straight coping, insure the coping joints do not line up with any of the pool wall panel joints, except at the junction of the straight and pre-shaped coping. Finally, snap the coping clips over all the pool kit coping joints.

Stake & Secure The Swimming Pool Kit
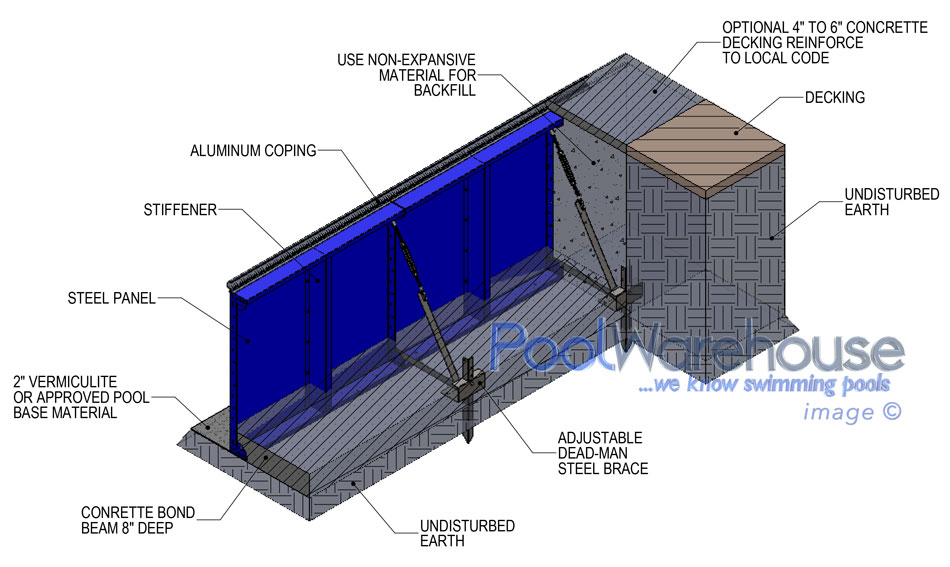
At this point the inground swimming pool kit wall panels are ready to be secured to the ground. First, use a hacksaw or sawzall to detach. polymer stakes from the pool wall braces. Place the stakes in the channels at the back of the braces and drive them into the ground, using a sledgehammer. SAFETY GLASSES MUST BE WORN WHEN DRIVING STAKES! Leave 1″ to 2″ of stake visible above the top of the stake channel. Snap the locking pin off the brace and use it to secure the brace to the stake. Next, drive 3/8” rebar through the pre-drilled holes in the bottom of each pool kit wall panel. This keeps the bottom of the panels from shifting when pouring the concrete collar. Use 18” pieces of rebar, driven 12” into the ground. Finally it’s time to brace the pool step. Use 3/8″ rebar and 2″ by 6″ wooden plank as shown in figure 11.

Finally Check Of Your Inground Pool Kit Walls & Braces
Once all inground swimming pool kit wall panels, braces and steps have been bolted together and the aluminum coping has been secured to the panels, it’s time for one final check. A few extra minutes spent verifying the shape of the pool kit at this stage of completion will lead to a proper vinyl swimming pool liner fit and ultimately a job well done.
- Check diagonal measurements across the swimming pool, at both the top and bottom of the panels, and verify that they are the same.
- Level all swimming pool kit wall panels, using patio block or bricks at the panel joints, so that the top of the panel is level with benchmark set at the start of construction.
- Check all pool kit wall panels for vertical alignment using a carpenter’s level on the face of the panel.
- Check all straight walls for horizontal alignment. To do this, stretch a string the entire length for each straight wall, at the top of the panels, insuring that each panel lines up with the string.
All Images & Content © PoolWarehouse.com
Jones
Pool Kit Specialist
[email protected]
Phone: 800-515-1747
www.poolwarehouse.com


 What are our customers saying?
