
Swimming Pool Kit Plumbing: Step 6
Before starting your swimming pool kit plumbing make sure to check with your local building or zoning office for applicable codes.
Main Drains

- MUST BE DONE BEFORE BOND BEAM IS INSTALLED
- TWO MAIN DRAINS MUST BE INSTALLED OR NO MAIN DRAINS – IT IS THE LAW
Attention: Swimming Pool Main Drains must be installed in accordance with the VIRGINIA GRAEME BAKER POOL AND SPA SAFETY ACT and all applicable ASME/ANSI safety standards. *American National Standards Institute and published by the American Society of Mechanical Engineers.
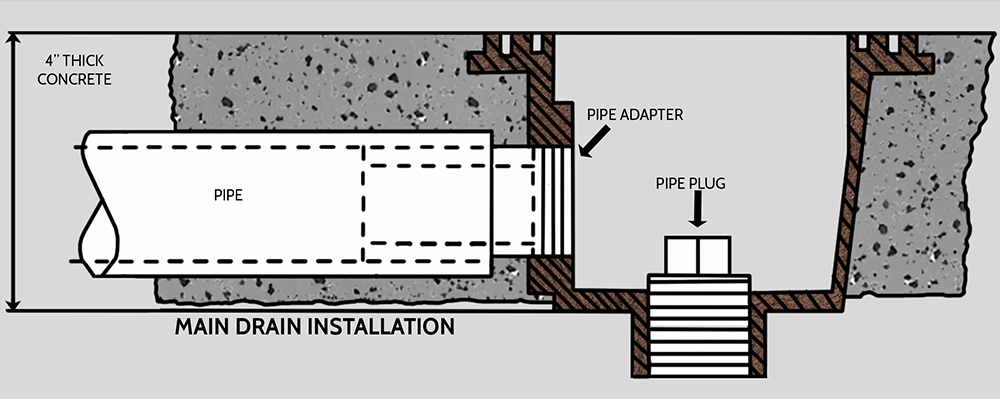
The main drains will be placed in the center of the hopper pad. Dig a 1’ wide by 18” deep hole for each main drain. MAIN DRAIN INSTALLATION MUST ADHERE TO THE VIRGINIA GRAEME BAKER ACT OF 2008. See www.poolsafely.gov for more information.
CHECK WITH YOUR LOCAL BUILDING/ZONING OFFICE FOR APPLICABLE CODES.
Dig two holes at least 3’ apart in the hopper, 1’ in diameter and 18” deep. Partially fill the holes with approximately 14” of rock. When the main drains are correctly positioned in each hole, the top of the drains should be at the finish grade, and there should be 4” to 6” of each drain exposed above the rock. The remainder of the hole must be filled with concrete to secure the drains in place. THE MAIN DRAIN MUST BE SET IN CONCRETE. To install your plumbing line, dig a small trench in the hopper, starting at the main drain, crossing the hopper, up the side or back wall slope (whichever is closest to the filter), and out under a panel. Set your line, cover with dirt and tamp. Leave the main drain faceplate and gaskets off until the liner is installed.
Return Fittings:
- On Polymer Walls, return fittings can be located on any section of the pool wall. On Steel Walls, they are precut.
- The returns are designed to work with the skimmer to produce a proper flow pattern that aids the skimmer(s).
- A return fitting hole is a 3” hole that is 12” to 15” down from the top of panel’s top flange.
- Drill holes from the back side of the panel, out of the way of any ribbing in the panel.
- After the hole is drilled, slide the return fitting through the front side of the panel with thread side first.
- Install nut snugly.
- Do not attach the faceplate at this time, you will do that after the liner is installed.

Concrete Bond Beam (Collar)
NOTE: CHECK WITH YOUR LOCAL BUILDING/ZONING OFFICE FOR APPLICABLE CODES.
Rule of thumb: 1 yard of concrete per 12-14 linear feet of the pool. A 16’ x 32’ rectangle would take 7-8 yards of concrete, 8” thick consistently.
Note: Make sure any plumbing that must be run under walls is marked and out of the way of the concrete.

- The collar secures the wall structure’s position.
- Make sure there are no openings or gaps under the step or panels.
- Run string lines on all straight panels to confirm they are flush with the string line.
- Pour the concrete carefully and slowly around the perimeter to keep the walls from moving, have the concrete slope away from pool walls.
- After the concrete has been poured and is still wet, recheck that the panel is plumb and wall alignment is straight as compared to strings.
- Step area should have concrete up to the first tread.


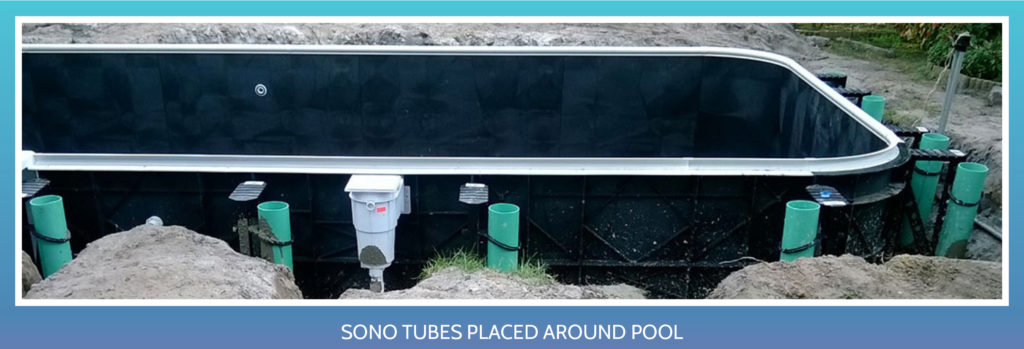
SONO Tubes
Grasp the deck supports and break the rings free from the center of the brace. Push the rings into the sockets until they lock into place then place a 6” tube (cardboard or DWV pipe) into the supports and cut to proper length. Pour the tubes full of concrete when you pour the collar. This will provide a vertical column to support the deck.
Light(s)
- Typically the light panels are precut.
- If so, follow the light manufacturer’s installation manual.
- Different manufacturers use different light configurations.

Skimmer(s)
- Typically the skimmer panels are precut.
- If so, follow the skimmer manufacturer’s installation manual.
- Different manufacturers use different skimmer configurations and gasket systems.
- Tape off the top of the skimmer so that debris does not enter skimmer body.

All Images & Content © PoolWarehouse.com

Swimming Pool Kit Plumbing Questions?
If you have questions about the Inground Swimmingg Pool Kit Wall Installation process please feel free to give us a call at 1-800-515-1747 or send us an email, [email protected].
At Pool Warehouse, We Know Swimming Pool Kits!


 What are our customers saying?
