Step 7: Aqua Genie Skimmer Installation

DON’T HAVE AN AQUA GENIE SKIMMER? CLICK HERE FOR MORE SKIMMER PLUMBING EXAMPLES
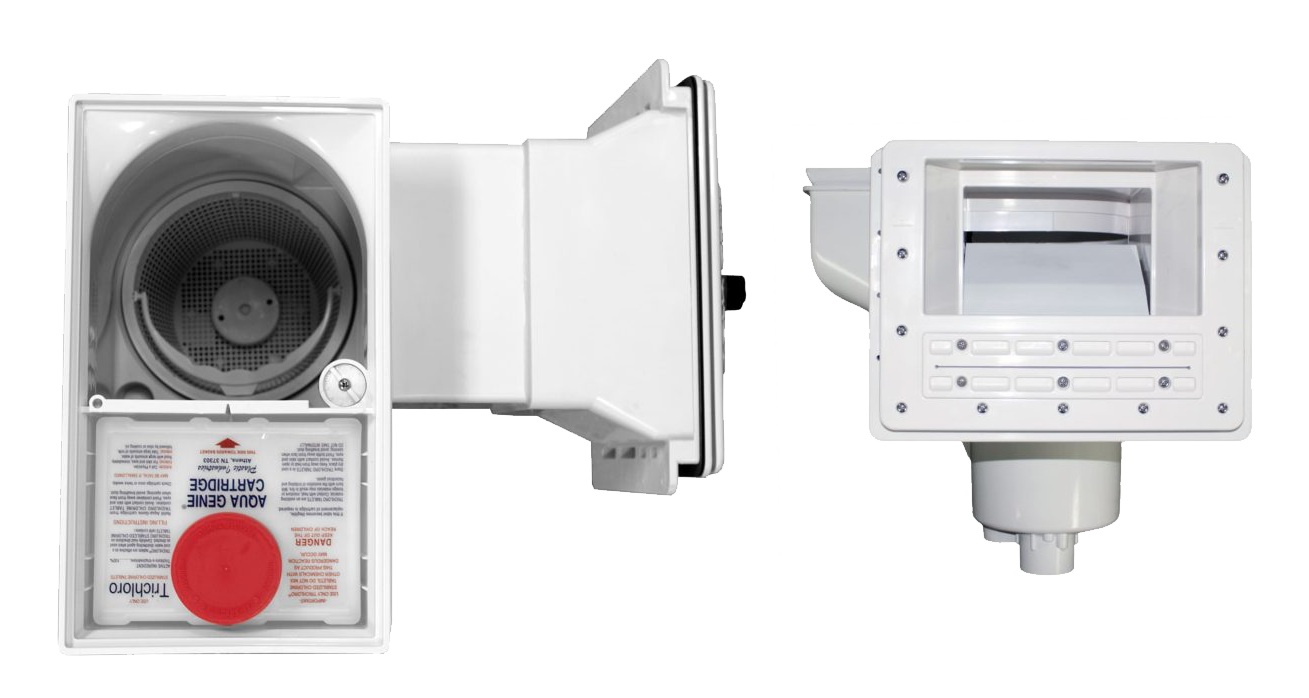
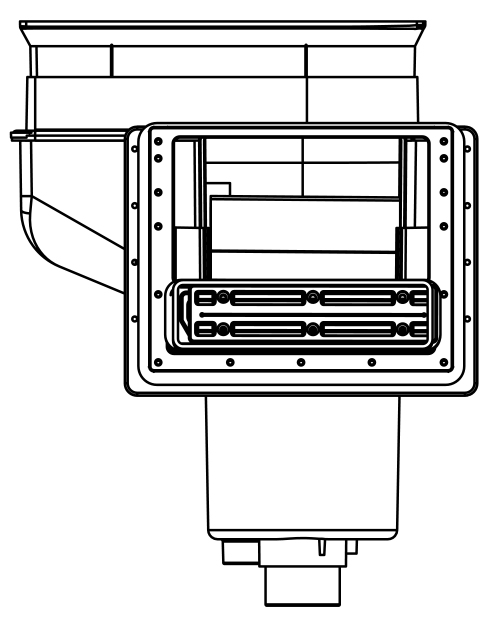
Aqua Genie Skimmer/Feeder
The Aqua Genie Skimmer/Feeder removes floating debris from surface water much faster than ordinary skimmers. In addition, it provides a constant controlled supply of chlorine to pool water automatically. Aqua Genie catches fine dirt, leaves, pollen, floating germ-laden scum before it becomes suspended in the pool water or settles to the bottom. Ten times as much water must be run through the filter to remove suspended dirt as to remove dirt caught while still on the surface.
Aqua Genie Installation Instructions
Read Completely Before Starting Installation
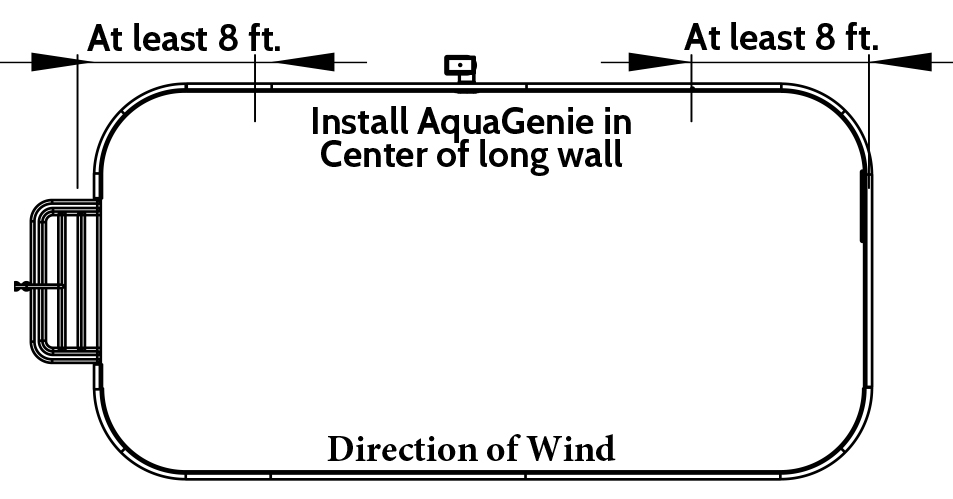
Aqua Genie Locations
The Aqua Genie should be located near the center of a long side of the pool. Vary the location to orient the AquaGenie’s mouth towards the prevailing winds as with ordinary skimmers. The action of Aqua Genie will be effective as long as It is installed at least eight (8) feet from either end. Choosing the correct location is important, but is not as critical as with ordinary skimmers.
Aqua Genie Pipe Adapters
Insert pipe adapters into the pressure throat port and the bottom port of the Aqua Genie. Use the proper sealant (Permatex #51 Pipe Joint Compound or equal) for threaded connections and POOLTITE without primer 30-second minimum snug hold for rigid pipe connections.
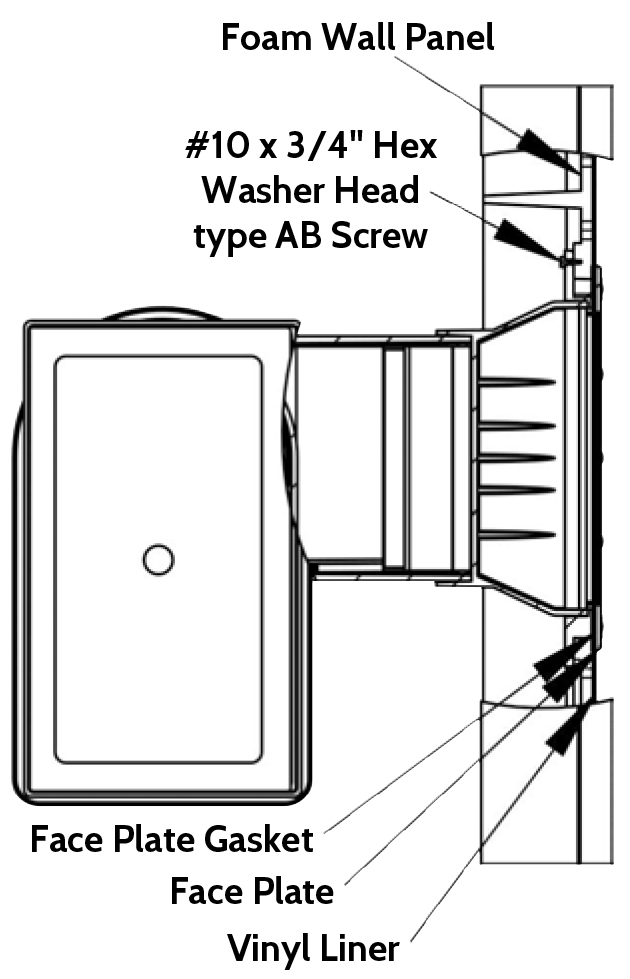
Aqua Genie Installation of Foam Wall Panels
Foam wall panels are designed with an embossed area for the AquaGenie mounting location. Drill holes (3/8” dia.) at each inside corner of the large embossed area on the back of the panel. Make a cutout by using a straight edge on the front of the panel to connect the holes.
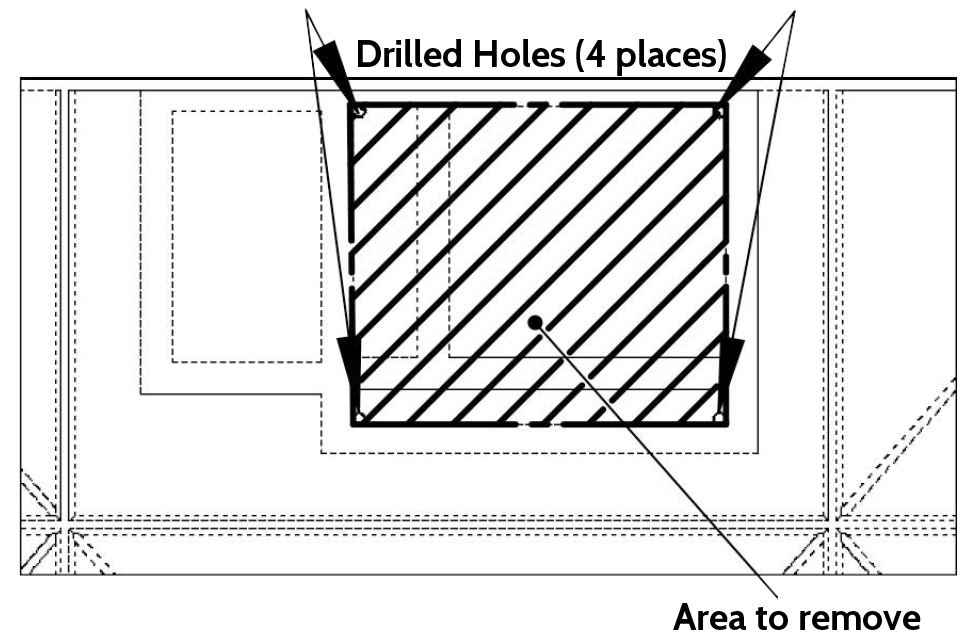
Using a jigsaw, cut the face of the panel to remove the shaded area shown in the sketch. Place AquaGenie in the cutout area and use holes as templates, mark holes. Using a 3/32” drill bit, drill pilot holes at marked spots. Holes should not be drilled all the way through but a maximum of 1/2”deep. Place AquaGenie in the cutout and mount from the back with (8) #10 x 3/4 hex washer head type AB screws.
Cutting Note: The best results will be obtained by using a jigsaw with 8 T.P.I. (fast cut, medium finish) blade. If Jigsaw is not available, use keyhole saw with 8-10 tooth combination blade. To prevent material buildup on the saw blade, a cutting lubricant (water) should be used.
 Aqua Genie in Steel Panel Pools with Factory Cut Off
Insert screws (part #H006636) through the wall from the inside of the pool. Place steel shim (part #H01556SW) on back of wall on screws (if needed), then line up theAqua Genie mounting holes with the screws. Use washer and nut to secure. The Aqua Genie face will go through the wall for gasket placement before the liner is installed.
Blocking Up: It is recommended to support the AquaGenie with a piece of l-112” PVC pipe in the proper receptacle, located in the bottom of the unit, and support on a level concrete block. Do not disturb the Aqua Genie while providing this support. Shim until the pier bears the weight of the Aqua Genie.
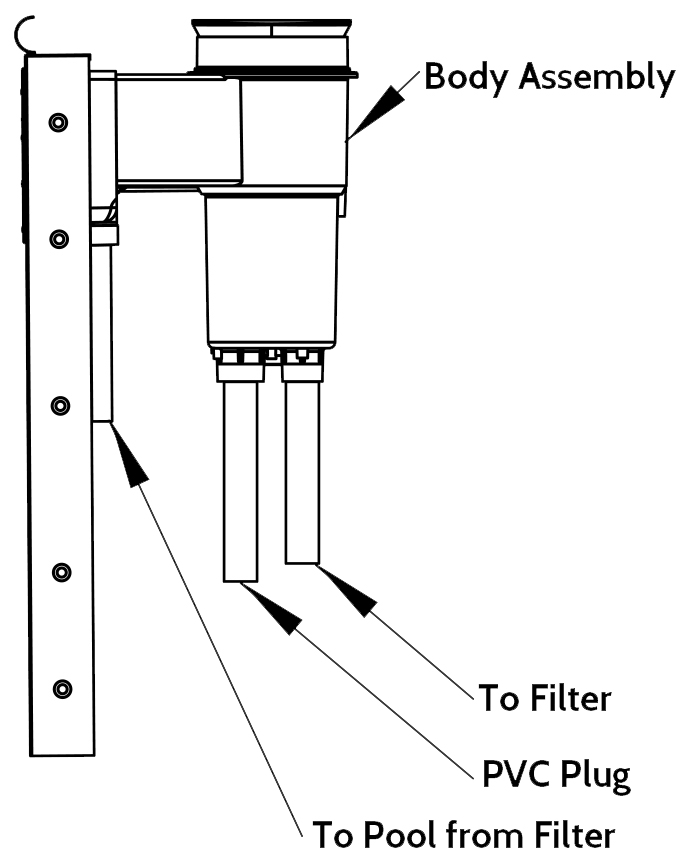
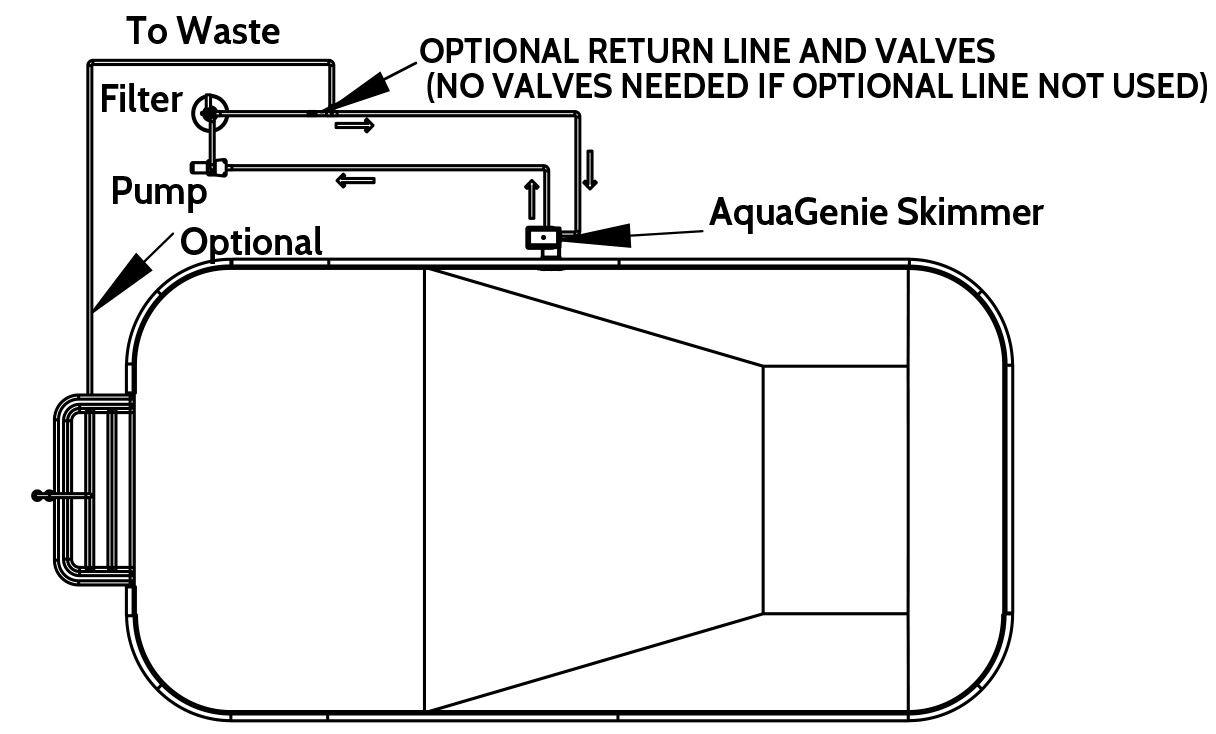
Aqua Genie Piping
Use as few elbows as possible in the piping of the entire recirculation system. Each elbow reduces the efficiency of the Aqua Genie in particular and the entire filtration system in general. Be sure to double clamp the return line when it connects to the adapter in the pressure throat. Follow piping layout as closely as possible.
Optional Overflow: Remove knockout from the bottom of skimmer body. Glue in a 1” x 5- 13/16” PVC pipe.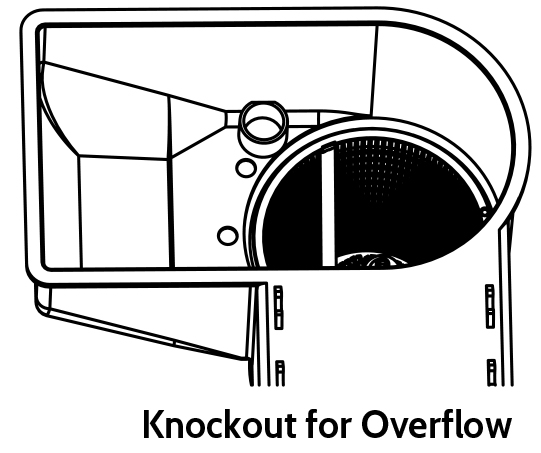
Installing the Aqua Genie Faceplate
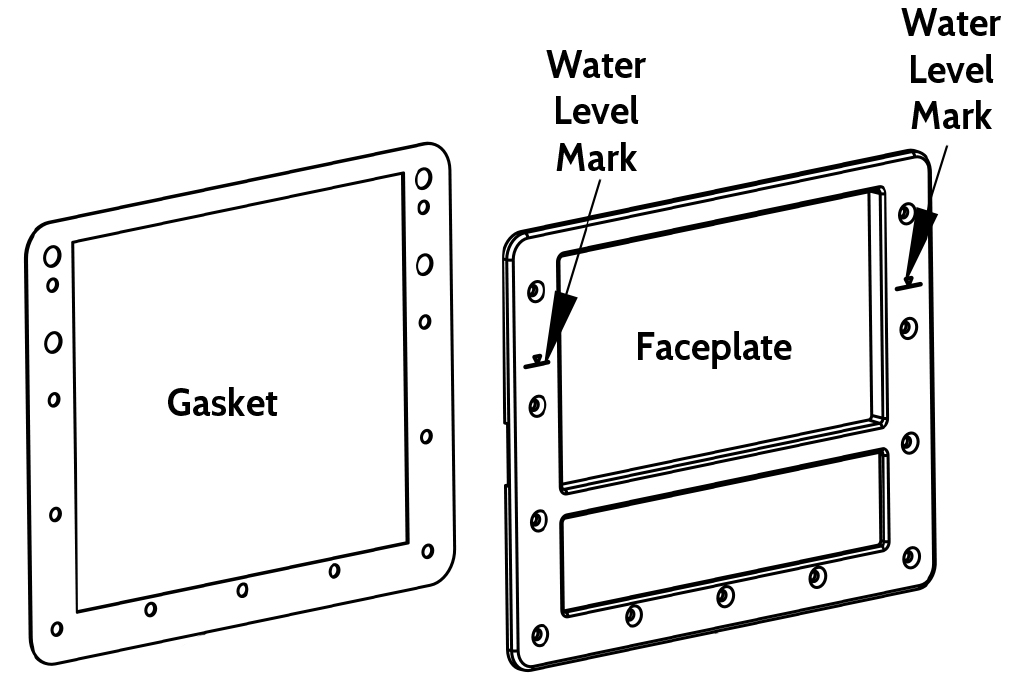
Step 1. Apply a small amount of sealant to one side of one of the large gaskets to hold it temporarily while assembling. Place the adhesive side of the gasket on the faceplate, aligning the holes.
Step 2. Before positioning the face plate assembly, make two small vertical slits in the vinyl liner.
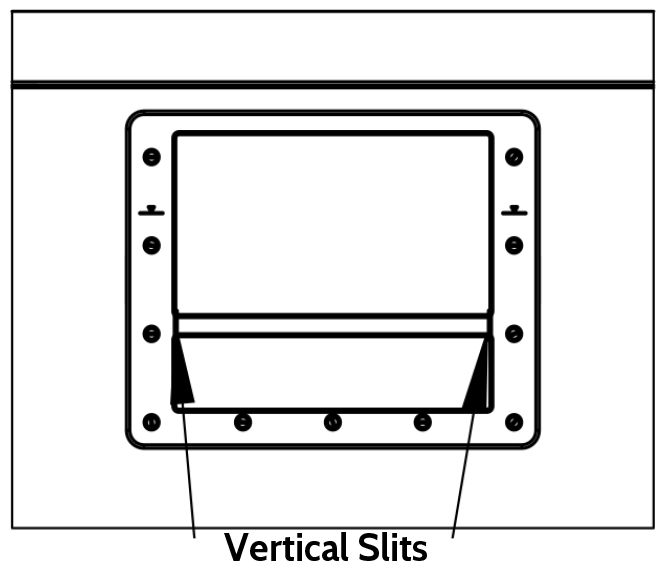
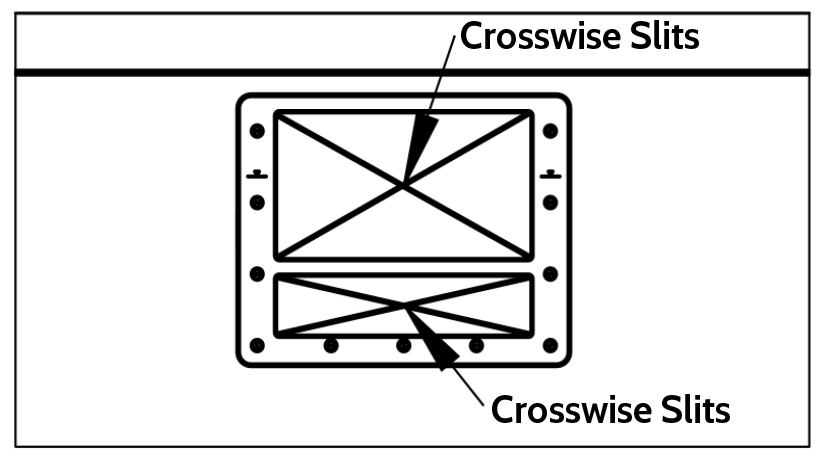
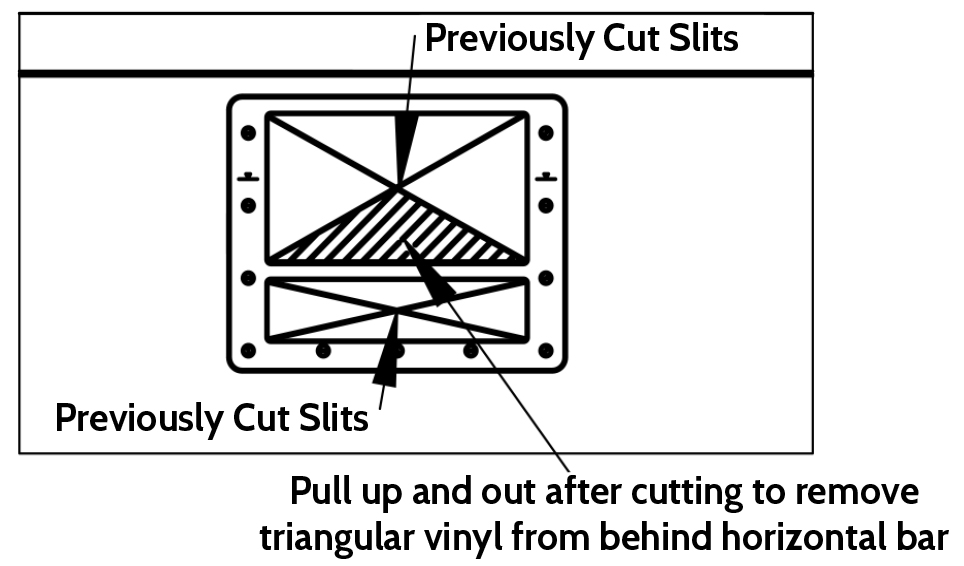
Step 3. The purpose of these slits is to permit easier removal of the vinyl from behind the horizontal bar of the face plate after installation of Aqua Genie. Carefully position the faceplate/gasket assembly on the vinyl liner, covering the face of the Aqua Genie. Pierce the liner through the top two holes of the face plate prior to inserting screws. Screw two Phillips head Hi-Lo screws into these holes using only a #3 Phillips screwdriver bit. Using any other size screwdriver bit will damage the screw head and prevent making a leak-proof seal. DO NOT completely tighten the two screws at this time. Allow the heads to project about 1/8” from the countersink in the faceplate. Now pierce the remaining holes through the face plate and tighten screws to within 1/8″ of the countersink. Relieve tension on the vinyl liner inside the face plate by making crosswise slits in the vinyl.
Step 4. At this point, you may tighten all screws completely (uneven pressure may distort the face plate and cause uneven seating of gasket seal). Excessive torque may break the corrosion-resistant screws. After the face plate has been installed, carefully cut out the vinyl liner using a sharp knife. Cut the top edge and the two sides of the skimmer opening, and the top, bottom and two sides of the orifice opening. Grasp the triangular piece of vinyl remaining at the bottom of the skimmer opening to remove it. The vinyl from behind the horizontal bar will be removed at this time.
Assembly of the Aqua Genie Orifice Plate
Only assemble the orifice plate after all piping is competed and flushed.
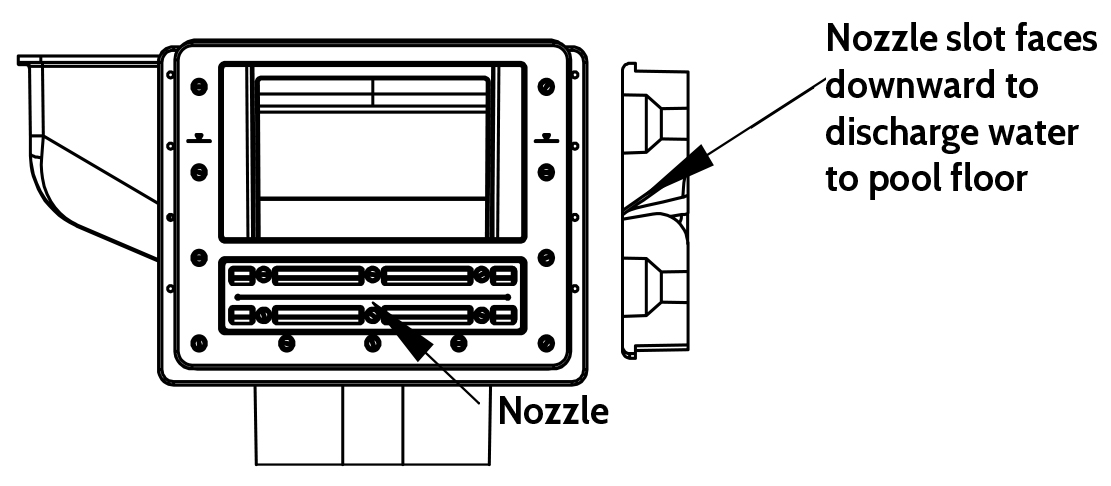
Apply a small amount of Permatex to the back of the orifice plate. Place a small gasket on the top, as marked, being certain all holes are aligned, and all edges are aligned. Before mounting the orifice plate to the Aqua Genie, make sure that when assembled, the nozzle slot slopes downward.
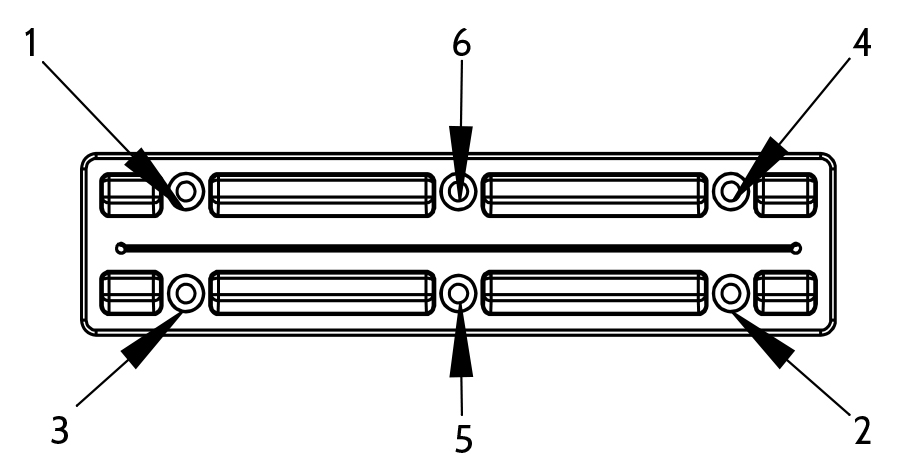
Secure the assembly using six Hi-Lo screws. Again, use only a #3 Phillips screwdriver. Tighten the screws evenly in the order shown below. Develop your final screw pressure by following this sequence 3 or 4 times, similar to the technique of tightening an engine head. The orifice plate is not designed to fit flush with the faceplate. The amount of protrusion will vary with the type of pool wall (foam, steel, or wood). Do not over tighten! A torque of 20”-1 lb. maximum is permitted. Excessive torque may break the corrosion-resistant screws.
Backfilling Around the Aqua Genie
All backfill around the feeder must be free draining coarse sand or fine gravel. It should be very carefully tamped into place with an implement such as a shovel handle in layers to give maximum support.
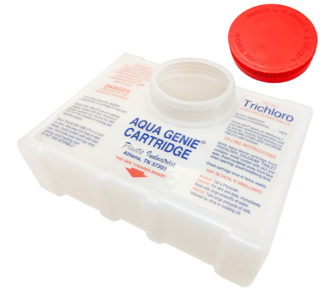
Aqua Genie Cartridge
Carefully read directions and cautions on Aqua Genie cartridge. Insert cartridge in feeder tray with cartridge cap being near the outside wall of the feeder tray. To prevent the possibility of a highly concentrated chlorine solution remaining in the feeder or entering the pool, the feeder tray will receive no water from the pressure chamber and will automatically drain if the filter pump is shut down or if there is a power failure.
Never put any material in the feeder tray other than Aqua Genie canisters and Trichloro tablets. Contact with other brands of chlorine tablets may cause a violent reaction or explosion.
Adjusting Chlorine Levels
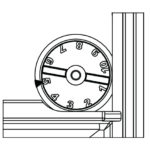
Start with an initial setting of 5 (five) on the chlorinator adjustment valve. Check your chlorine level and adjust to the desired level. 1 is the lowest setting with 10 being the highest. When replacing the cartridge, turn to lowest setting before removing.
Aqua Genie Operation
The Aqua Genie feeder is operated by water being returned by the filter to the pool. This clean water is directed down and out through a nozzle slot in the orifice plate. The sheet-like jet of water created by this action causes counter currents which increase the effectiveness of the Aqua Genie’s skimming action. Pressure built up in the pressure chamber (behind the orifice plate) diverts some of this water through the tubing into the feeder tray. In the feeder tray, a supply of chlorine is being constantly dissolved. Chlorine-laden water now pours over the tray’s V-notch into the main sump of the AquaGenie, where it disinfects the water being drawn into the skimmer. Chemically treated water is then sent to the filter for removal of solids and is returned to the pool. If you desire to return the filtered water to the pool through an auxiliary return fitting, or through a jet nozzle installed on optional stairs, it’s important to maintain water flow to the Aqua Genie. If the pool is equipped with such an auxiliary return, there should be a valve on the return line to the Aqua Genie, and another valve on the line to the auxiliary return fitting. When using the auxiliary return line, don’t close the valve on the Aqua Genie return line. Keep it “cracked open” enough to continue a flow of water to the Aqua Genie. Enough back pressure will develop to keep the feeder operating. As long as water is leaving the feeder tray over the V-notch, it is being chlorinated and returned to the circulatory system. For full benefit of Aqua Genie’s automatic skimming and chlorinating, do not use auxiliary returns unnecessarily. Keep AquaGenie operating normally, with a full flow as continuously as possible.

Aqua Genie Maintenance
Always maintain the water level of pool up to the water level marks on the Aqua Genie faceplate. Flow should be over the weir. Always bring the water level up to marks as soon as possible.
Aqua Genie Vacuuming
- Clean baskets before vacuuming. Backwash filter before and during the procedure, if the condition of the filter bed hampers flow.
- Screw plastic insert fitting in the vacuum adapter plate. Fill vacuum hose with water, attach the hose to fitting and drop adapter plate over basket (or simply insert vacuum hose in adapter plate). The adapter plate is tapered to seal against the seat in the Aqua Genie’s main sump.
- Debris vacuumed off the bottom will be caught in the basket. Some material (hair and grass, for example) may pass through to the pump strainer. The finer material will be caught in the filter.
Aqua Genie Parts
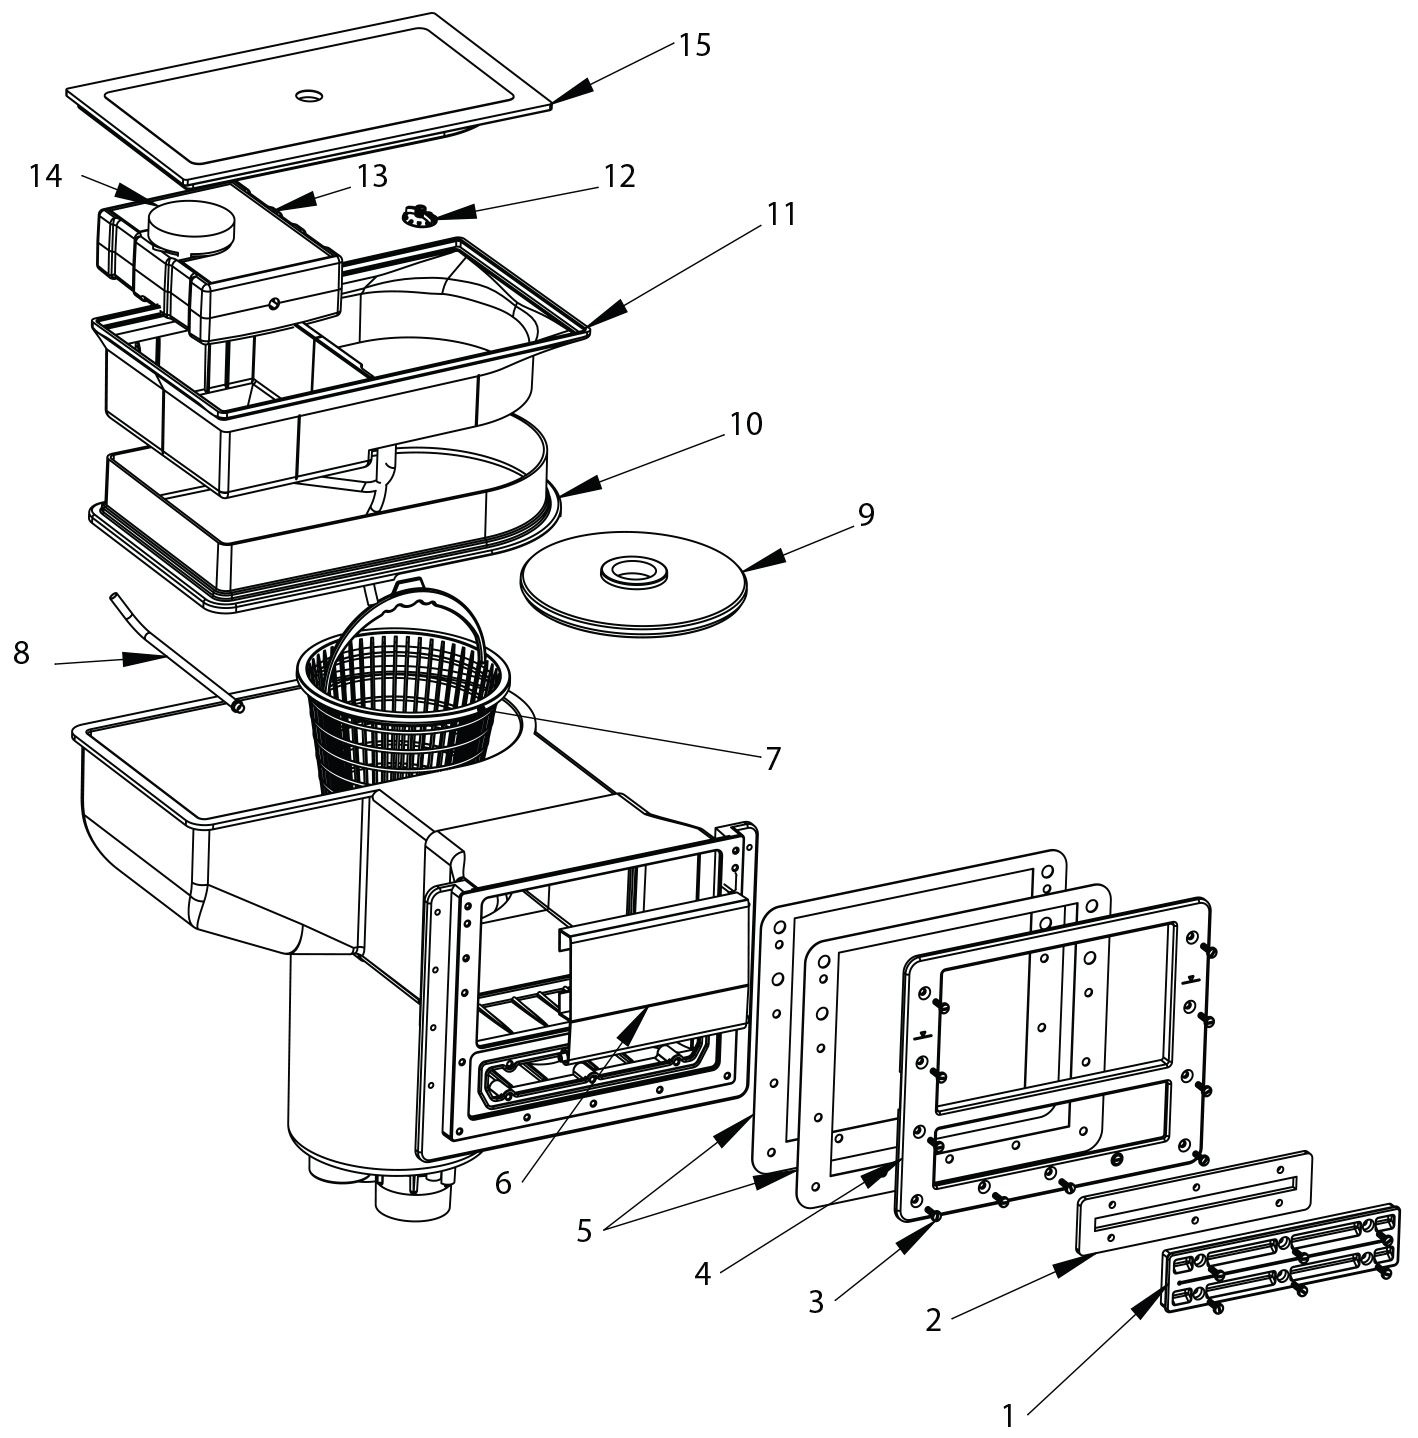
| Item # | Part # | Description | # Required |
| 1 | HG110 | ORIFICE PLATE | 1 |
| 2 | H02190 | ORIFICE PLATE GASKET | 1 |
| 3 | H00635 | SCREW SET | 1 |
| 4 | HG105 | FACEPLATE | 1 |
| 5 | H01616 | FACEPLATE GASKETS | 2 |
| 6 | HG150 | WEIR ASSEMBLY | 1 |
| 7 | HG130P | BASKET (INCLUDES HANDLE) | 1 |
| 8 | H01691 | SS FEEDER TUBE (W/O-RING) | 1 |
| 9 | HG115N | VACUUM ADAPTER | 1 |
| 10 | HG140 | EXTENSION COLLAR | 1 |
| 11 | HG120 | COLLAR FEEDER | 1 |
| 12 | HG155 | VALVE ASSEMBLY (W/HOSES & O-RINGS) | 1 |
| 13 | HG145 | CARTRIDGE ASSEMBLY(W/CAP & LABEL) | 1 |
| 14 | HG01664 | CARTRIDGE CAP ONLY | 1 |
| 15 | HG125 | COVER | 1 |
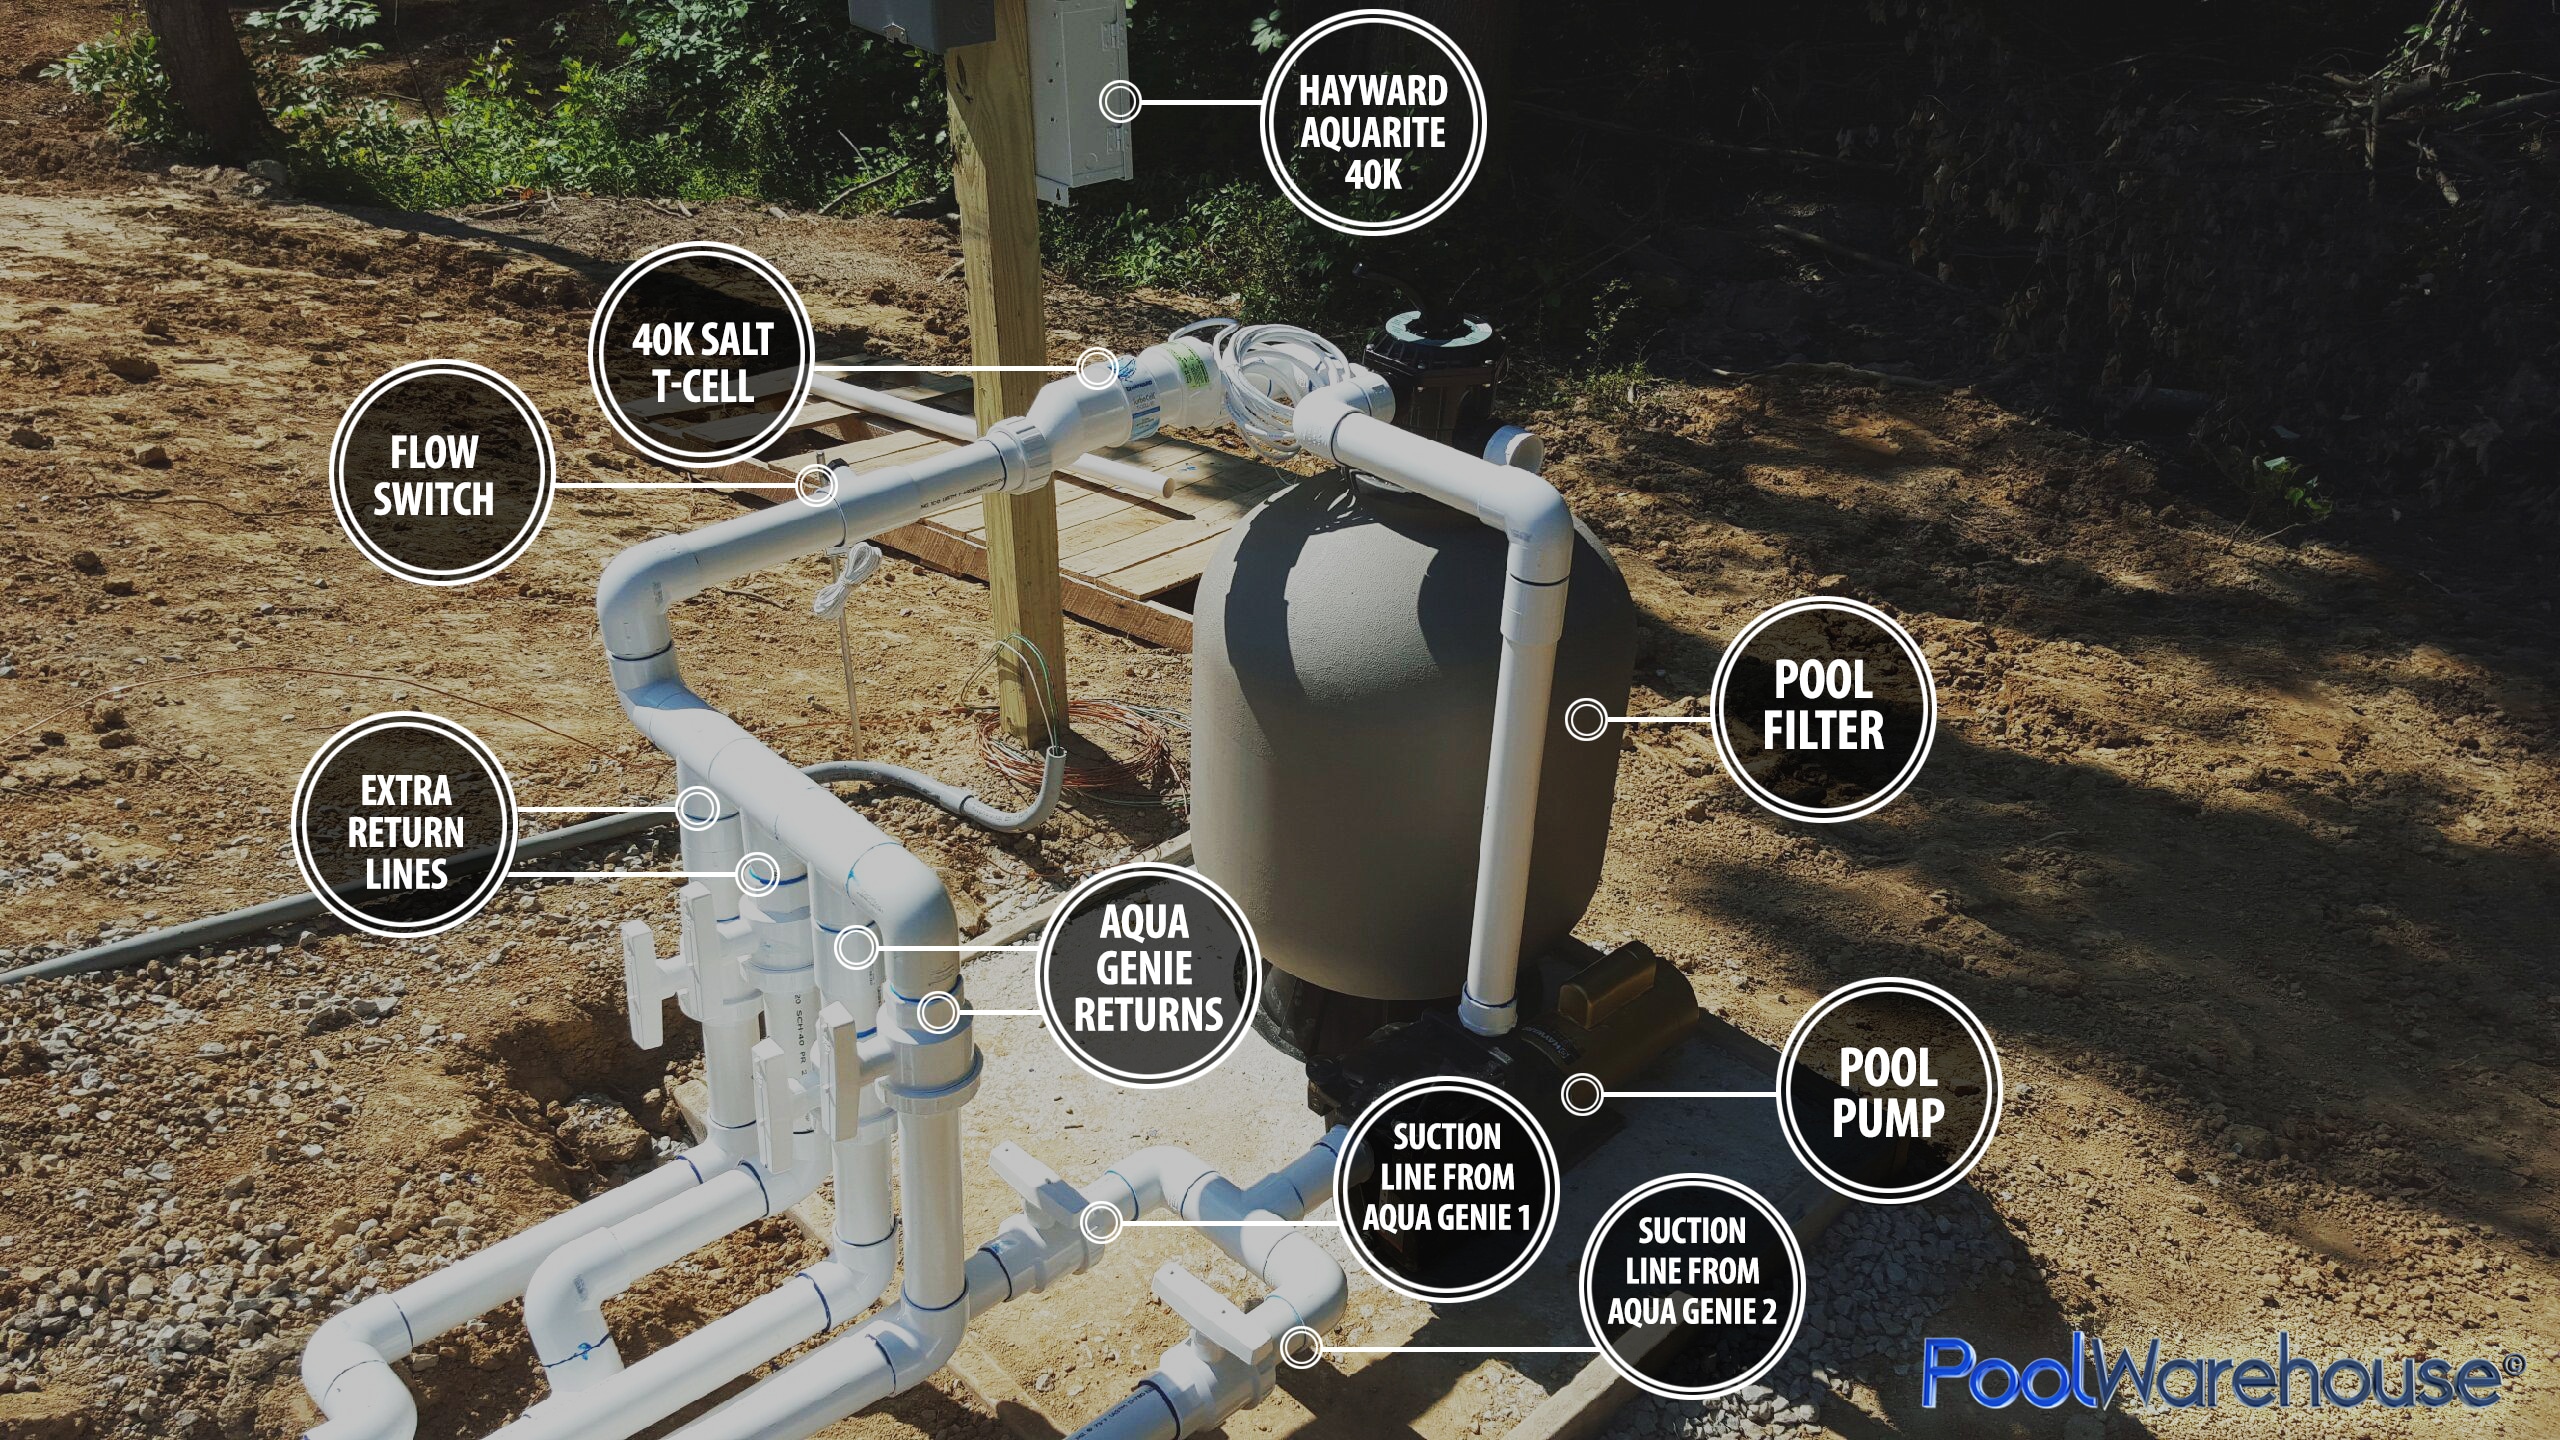
Check Out The AquaGenie’s Simple Plumbing Diagram!
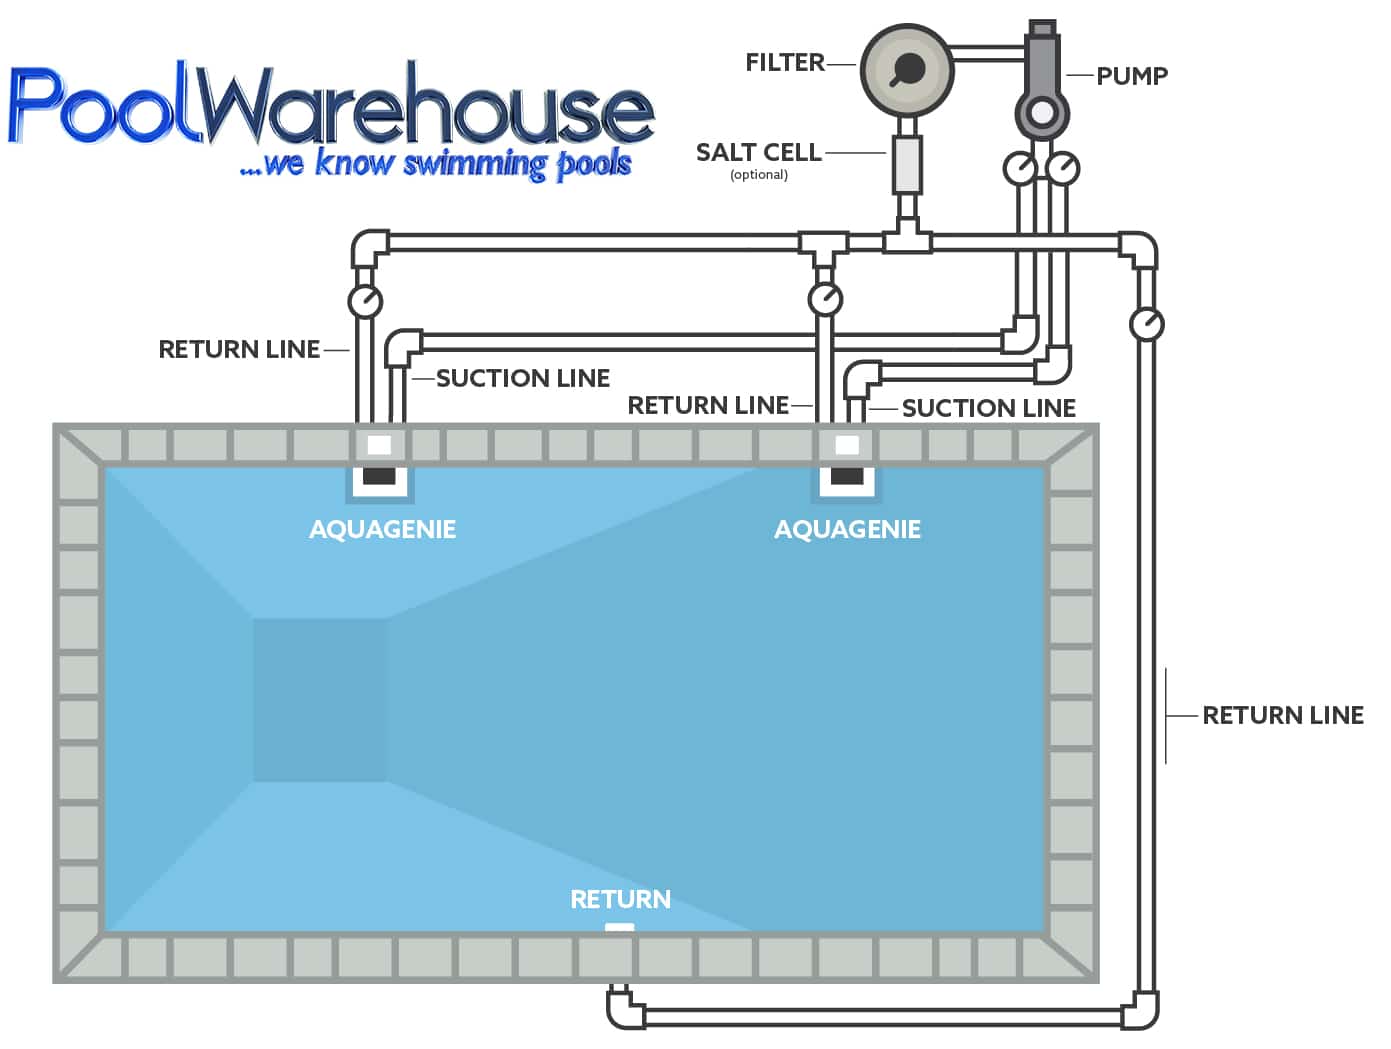
The picture below is a great example of how you plumb your swimming pool when using the Aqua Genie skimmer system and a Hayward salt system.
Watch The AquaGenie Video Below To Learn More!

All Images & Content © PoolWarehouse.com

If you have questions about the Inground Swimming Pool Kit Wall Installation process please feel free to give us a call at 1-800-515-1747 or send us an email, [email protected].
At Pool Warehouse, We Know Swimming Pool Kits!

