Behind every crystal-clear pool oasis lies a hidden hero – plumbing, the lifeblood of your Hydra Pool project–ensuring your aquatic haven not only survives, but thrives! And while many of you will be focused on the design and aesthetics of your pool, your plumbing system and plumbing pad are essential components that ensure the pool functions efficiently. Properly routing your pool’s plumbing and setting up the plumbing pad is crucial to maintain water circulation, filtration, and sanitation. In this comprehensive guide, we’ll walk you through the steps to route your pool’s plumbing and create a well-organized plumbing pad.
Why Plumbing Matters in a Pool
Before diving into the details of plumbing routing and the plumbing pad setup, let’s understand why the plumbing system is so crucial for your pool:
- Water Circulation: By properly routing your plumbing, you are ensuring that your pools water circulates effectively through your pool. This circulation is essential for even water distribution, chemical dispersion, and maintaining water clarity and quality.
- Filtration: The pool’s filtration system relies on plumbing to draw water from the pool, pass it through the filter, and return it clean and clear. Efficient filtration is vital for removing debris and contaminants from your water that can cause bacterial growth in your aquatic biome.
- Sanitation: Many pools use chlorine or other sanitizers to keep the water clean and safe for swimming. Plumbing delivers these chemicals to the pool in a controlled manner, ensuring optimal sanitation levels.
- Heating and Cooling: If your pool has a heating or cooling system, the plumbing is responsible for distributing water to these systems, maintaining the desired water temperature.
- Water Features: Pools often have water features like waterfalls, fountains, or jets. Proper plumbing is necessary to power and control these features.
Now that we have gone over the basic importance of the plumbing system for your pool kit, let’s go over the basic steps on how to route and set up the plumbing system and pad.
Step 1: Planning Your Plumbing System
Luckily, the first step in this process requires what got you into this project in the first place–thought and consideration. When planning the design of your pool, one of the first things you will do is map out the shape and layout of the project with spray paint on the ground where your pool will be located. By doing this, you have laid out what the structure of the pool will look like and can work off of this design to layout your plumbing.
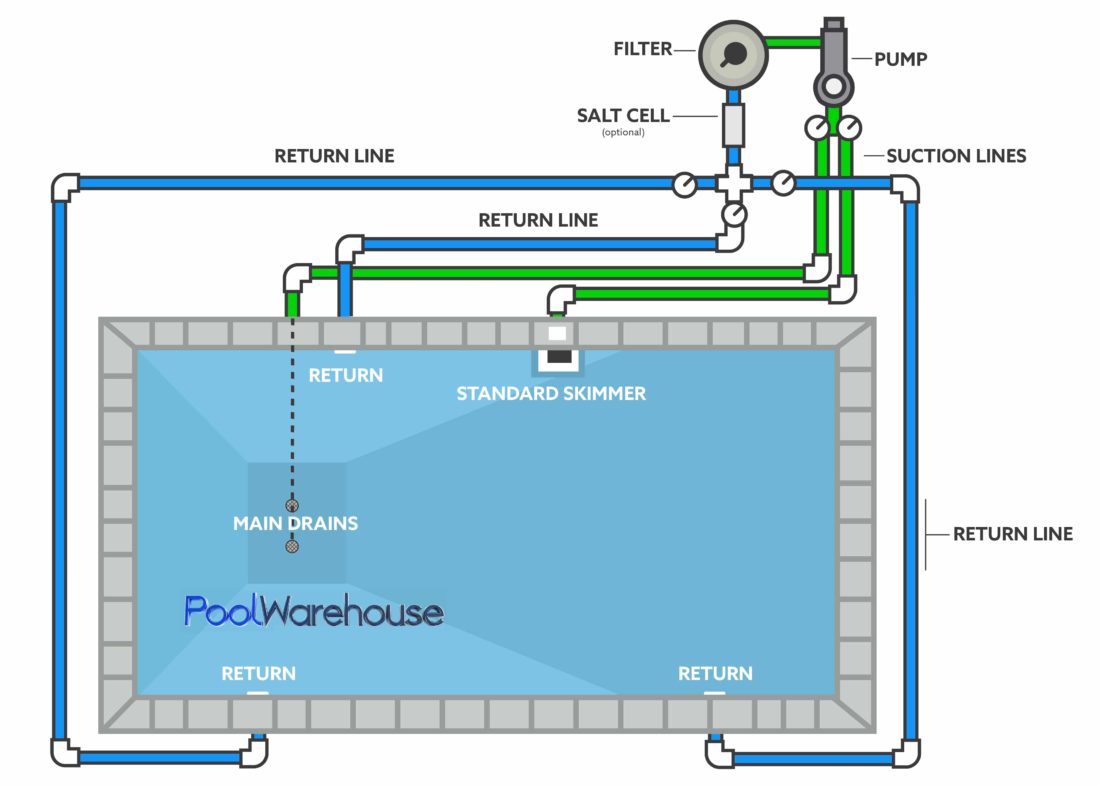
(Insert basic grecian plumbing diagram)
As you can see above, the shape and style of the pool you choose can determine the way you plan your plumbing system. This example is based on a small grecian pool with 1 standard 1084 skimmer and 2 returns. In addition to that, you can see that there are also images of your basic pump and filter set up as well.
Step 2: Understanding the Components of Your Pools Plumbing
On to the next! The next step we will be reviewing in this process will be what equipment goes into plumbing your pool and what the function of each of those items are.
1: Skimmer
The skimmer is a mechanism/space in the inner wall of your pool where water enters into the plumbing system behind the walls. Depending on the size of the pool, you might have multiple.
2: Suction Lines
Once the water has passed through your skimmer, it will enter the suction lines. These are the plumbing pipes, usually made from PVC, that direct water around the structure or pool.
3: Elbows:
This is a connector pipe that connects a straight piece of suction lines to direct it either left or right.
4: Pump:
Now that the water is running through the suction lines, what pushes it through the rest of the plumbing lines? If you said gravity, or inertia, then you are well read, but incorrect. It is actually your pump! Your pump is the heart of your pool and uses suction power to draw water from the skimmer into the suction lines. Note that pool pumps come in different sizes and horsepower. So, depending on the amount of gallons of water (see our pool volume calculator to help determine how much water is in your pool) in the pool, your pool pump might either be large or small.
5: Filter:
Once the water has left the pump and cycled through, it will be pushed through to your filter to be cleaned and sanitized. Depending on the type of pool filter you have it may remove everything from larger types of debris like leaf litter, bugs, twigs, to hair and bacteria.
And finally, that the water has been cleaned, it will leave the filter and run back through the return lines and back to your pool!
7: Valves and Manifolds:
Valves and Manifolds are pipe regulating mechanisms that control the flow of water within your pools plumbing system. They are using to divert water to a different area or feature of your pool as needed.
8: Returns:
These features are commonly referred to as jets or return jets. They serve as small openings situated along the pool’s perimeter, allowing the newly purified water to flow back into the pool. It’s important to orient these wall returns in a manner that facilitates continuous water circulation.
To illustrate, envision yourself positioned beside your pool with the shallow end on your left and the deep end on your right. Let’s assume that the returns are located on the wall opposite you, while the skimmer is situated on the side where you’re standing.
In this scenario, it’s advisable to direct all the wall jets towards the right, guiding the water toward the deep end. This deliberate flow ensures that water moves in a single direction, effectively compelling it to circulate around the pool and reach the skimmer, establishing a tangible pool circulation.
Moreover, it’s essential that the return jets in the shallow end face various directions to prevent water stagnation over the steps. This strategic arrangement guarantees that water movement is evenly distributed, preventing any areas of your pool from becoming stagnant.
9: Main Drains:
Each inground pool typically features a main drain situated at the bottom of the deepest section. Depending on your pool’s dimensions, there could be multiple main drains in place. Side note here: All pools produced in North America must be in line with the Virginia Graeme Baker Pool and Spa Act. Please research this law before starting any pool projects.
However, it’s crucial to emphasize that fully draining your pool is never advisable. Doing so can lead to a range of issues, including structural damage such as cracks or even the pool being displaced from the ground entirely.
In the event that your pool requires drainage for maintenance, cleaning, repairs, or repainting, we strongly advise seeking the expertise of a professional. This precautionary step is essential to prevent any potential harm or permanent damage to your pool.
10: Water!:
I bet you haven’t considered this aspect before, but it’s an undeniable truth: water plays a fundamental role in the functionality of every pool’s plumbing system. Deprived of it, the pump’s performance becomes compromised, the filter dries up, and even a simple dive into the deep end could lead to unintended consequences.
In all seriousness, maintaining the correct water level in your pool is paramount for the efficient operation of your plumbing system.
During sweltering weather, keep a vigilant eye on the water level, as it tends to diminish due to evaporation. Conversely, when your pool experiences a consistent amount of rain, be mindful of the water level rising to the extent that it covers the skimmers and disrupts the plumbing and circulation. Always bear in mind that the water in your pool serves a dual purpose. It not only provides the backdrop for your swimming adventures but also plays a substantial role in ensuring the seamless operation of your pool equipment and systems.
Step 3: Routing Your Plumbing
Now that we have a clear design for the pool, and have gone over each item that will be included in your plumbing, lets take a look at a couple of plumbing diagrams that are used for different designs.
(Insert 1 Skimmer 3 return 2 main drain image)
For this diagrams purpose, we will call this a 16×32 rectangle or smaller, due to this plumbing arrangement being typical with that size and shape pool. Typically, with this arrangement, the two returns on the opposite side of the pool with constantly push the water toward the central skimmer on the inner wall of the pool. Although, you might be wondering about the other return that is on the same side as the skimmer. Why is it positioned there? Shouldn’t it be pushing the water toward the skimmer along with the others? Well, the reason that the return is positioned there is so that the water on that side of the pool doesn’t grow stagnant. By having the return in this position, your pools water is constantly moving and is pushed toward the main drains as well–which further circulates the water.
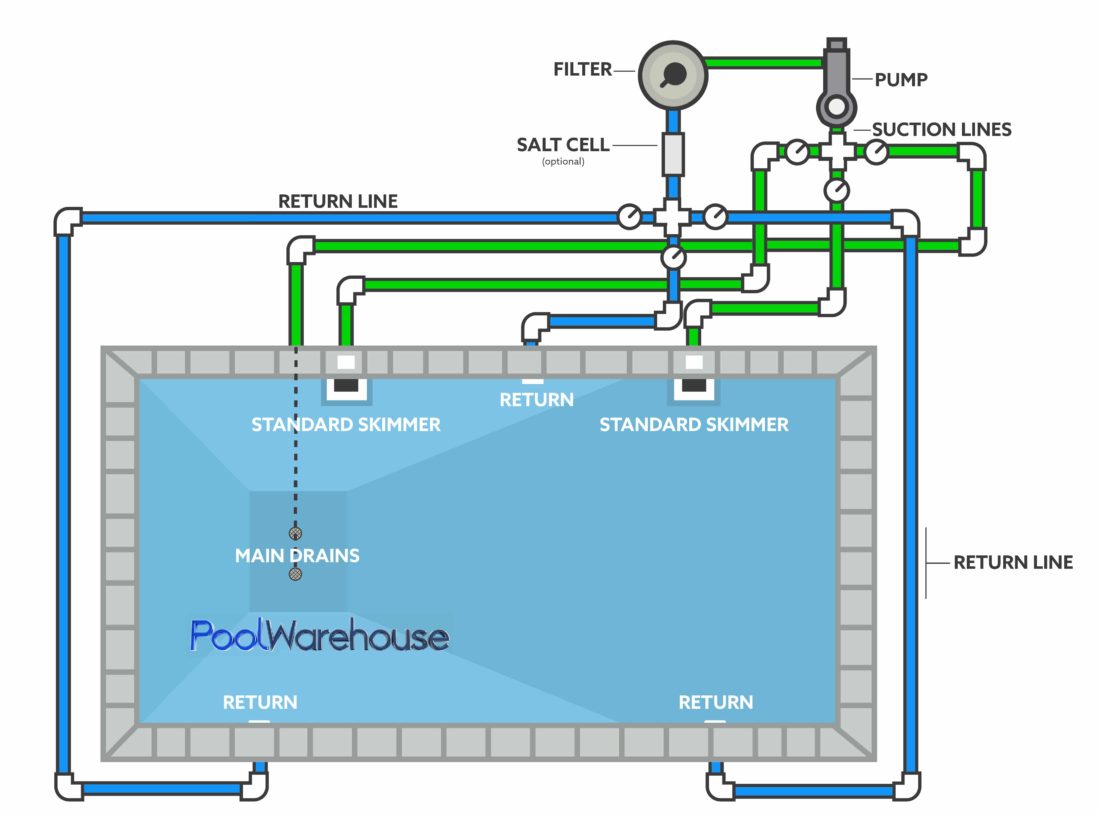
(Insert 2 Skimmers, 2 Main Drains, and 3 Returns image)
This plumbing arrangement is typical for larger pools–example, 20×40 Rectangle. In a larger pool, you will notice that we have added an additional skimmer. The intent behind adding this additional drain point is to allow for more water to drain through the pools suction and return lines toward the plumbing pad. This is due to the increase in pool size and gallons of water in the pool. By having this additional skimmer, your will stay cleaner longer and reduce the amount of maintenance.
With these designs in mind, each and every pool is different–meaning your diagram could either be the same as the above or more complex. Regardless, we recommend that with whatever shape/pool design you discuss with our sales team (call 800-515-1747 ext. 1 for Inground Sales), you consider all of the options for additional water features and plumbing accessories throughout the process that will contribute to the complexity of your plumbing system.
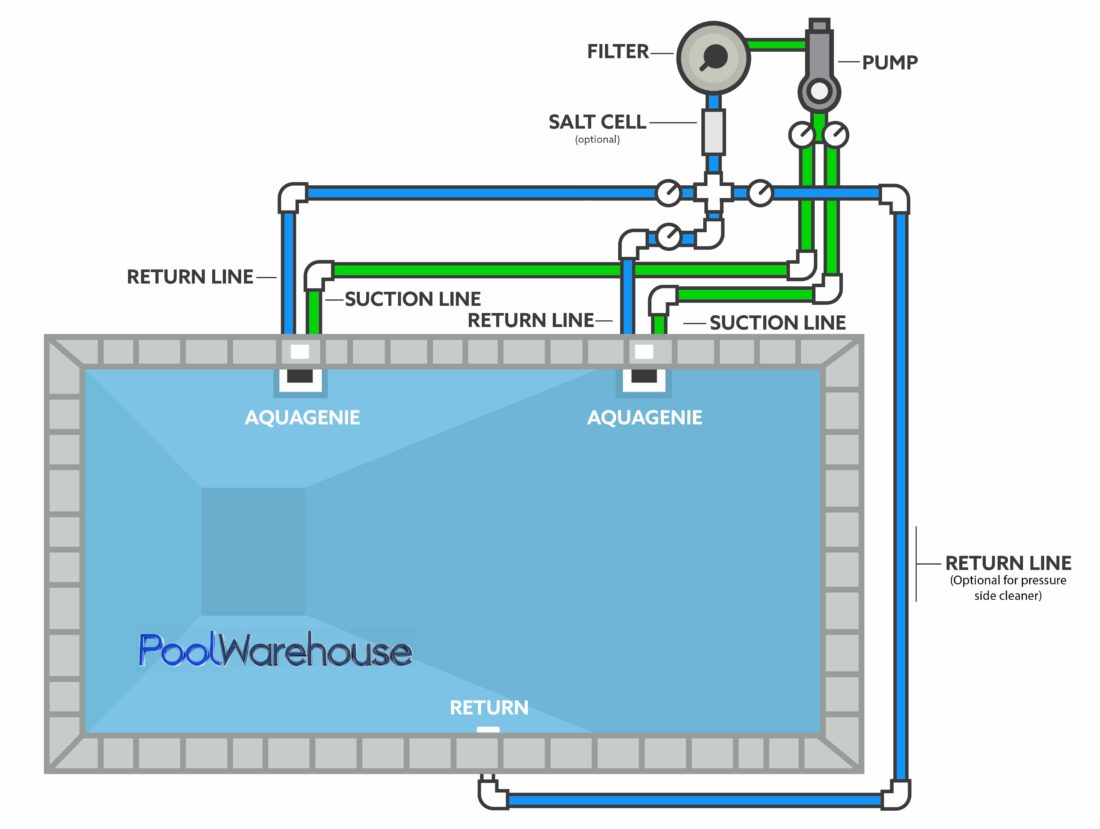
Step 4: Setting Up your Plumbing Pad
The plumbing pad for your pool is where all of your equipment is housed and where all of our pools plumbing has been routed to. Below, you can see a simple design of what a standard plumbing looks like with most common pool designs and layouts.
(Insert Pool Plumbing Pad Image)
And lastly, below you will see that we have provided a simple step by step on setting up your plumbing pad. To reiterate, every pool is different and the amount of water features and pool add-ons will contribute to the complexity of both your plumbing layout and your pads design. Nevertheless, the steps we have laid out below are a relatively standard guide to setting up your plumbing pad for your pool!

Choose a Location
Select a location for the plumbing pad that is accessible, well-ventilated, and protected from the elements. It should also be close to the pool to minimize the length of plumbing runs. A general recommendation for the amount of distance in between your pool and plumbing pad would be to set the pad up about 15 to 20 feet from the pool.
Concrete Slab
Create a concrete slab for the plumbing pad. Ensure it is level and provides a stable base for the equipment. Allow space for future additions or replacements. Additionally, a good pad size would be a 4 sqft.x 8 sqft. slab to start. This size is pretty standard considering your basic equipment should fill this space and allow some extra room as well.
Equipment Placement
Position the pool equipment on the plumbing pad according to your design. The pump, filter, heater, and other components should be securely anchored to the pad.
Plumbing Connections
Connect the plumbing to the pool equipment following your design. Use appropriate fittings and sealants to prevent leaks.
Electrical Connections
If your pool equipment requires electrical connections, ensure they are safely installed by a certified electrician. This will ensure that your pool stays within both national and local construction codes.
Ventilation
Install proper ventilation to prevent heat buildup in the plumbing pad area. Adequate airflow is essential to keep the equipment cool and extend its lifespan.
Labeling
While this might seem like a tedious task, labeling all the plumbing connections and equipment will make for easy identification and maintenance if the need arises. This helps you and future pool techs troubleshoot and service the system efficiently–eliminating a good portion of the guess work on your end.
Plumbing Diagrams
Now, even with all of the step-by-step info that we have listed above, we understand that drawing something out can be really helpful in understanding a broad process such as plumbing your pool. So, with this in mind, we have provided a couple examples of how to plumb a pool with a couple of different variations. See below.

Conclusion
When purchasing a Hydra Pool from poolwarehouse.com, the sales staff will discuss the importance of routing your pool’s plumbing and setting up the plumbing pad and why it is a critical step in creating a well-functioning and efficient pool. With careful planning and attention to detail, you can enjoy crystal-clear water, comfortable temperatures, and the soothing sounds of water features. Remember that proper maintenance is key to ensuring your pool plumbing system continues to operate smoothly for years to come. So, dive into the world of pool plumbing, and make your backyard oasis a reality by calling our offices and speaking with our sales staff at 800-515-1747 ext 1 for Inground Sales, or email [email protected].

