Replacement Swimming Pool Liner Installation
Replacing your old in-ground swimming pool liner is easier than you might think. Read the following tips and learn how to save several thousand dollars by replacing your old vinyl pool liner on your own.
General Pool Liner Storage Information
Your vinyl in-ground pool liner should be stored in areas with temperatures above 50 ̊F to prevent excessive shrinkage and permanent folds in the vinyl material.
Cold Weather Replacement Swimming Pool Liner Installation
When installing an vinyl in-ground pool liner in temperature of 65 ̊F or lower, store the liner at 70 ̊F to 80 ̊F for at least 72 hours prior to installation. When the pool bottom is finished, bring out the swimming pool liner and put it in as quickly as possible. Try to install the vinyl pool liner while in direct sunlight to help seat/fit it properly. Do not leave a boxed vinyl swimming pool liner exposed to the outdoor elements.
Tools Needed For Replacement Swimming Pool Liner Installation
- Commercial vacuum(s) (MightyVac recommended) or equivalent Shop Vac, Screwdrivers, Phillips & Flat Head
- A Razor Knife
- A Garden Hose
- A Broom
- Two & Up To Four Friends To Help
Replacement Swimming Pool Liner Installation
Your vinyl in-ground swimming pool liner installations can be fast and easy – just follow these installation guidelines!
1. Before you begin installing the in-ground pool liner, insure that the pool kit bottom is free of any stones, sticks and footprints. Vacuum with shop-vac thoroughly before starting.
2. Use duct tape to tape all pool kit wall panel joints.
3. Use caulk to secure gaskets to the pool main drain and pool skimmer.
4. Insure swimming pool coping liner track is clean and free of any sand, concrete, etc.
5. If pool steps are used, refer to the pool STEP section before continuing with the in-ground swimming pool liner installation.
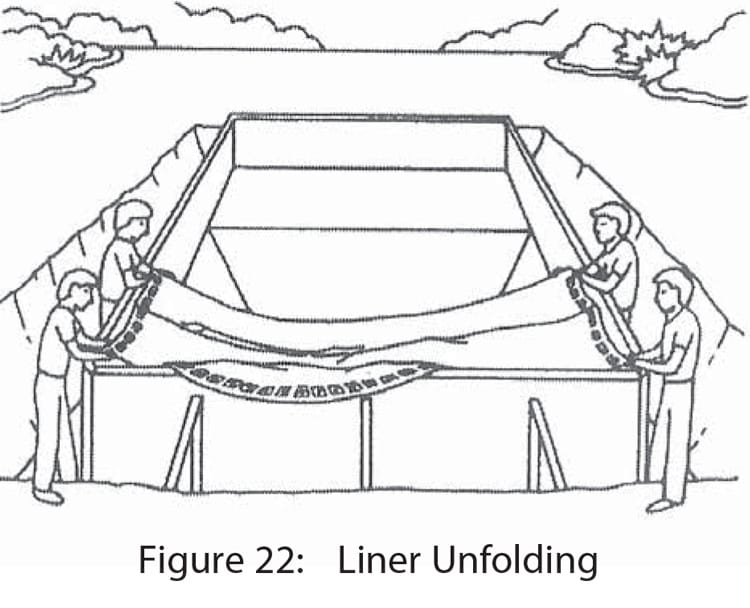
6. Place the replacement swimming pool liner box at the deep end of the pool kit, with arrows facing the right direction. Open the vinyl pool liner box carefully, be cautious with sharp knives or box cutters that could puncture the swimming pool liner. Make sure to carefully unfold the pool liner. Have two people take the shallow-end corners and pull the vinyl pool liner to the shallow-end (see Figure 22), keeping the swimming pool liner away from any sharp edges. AVOID DRAGGING YOUR VINYL SWIMMING LINER ACROSS THE POOL BOTTOM.
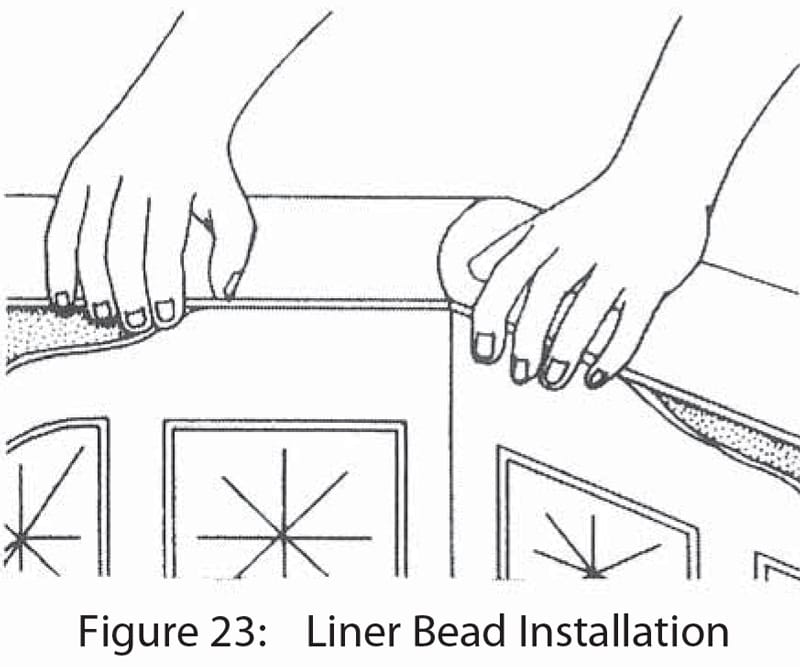
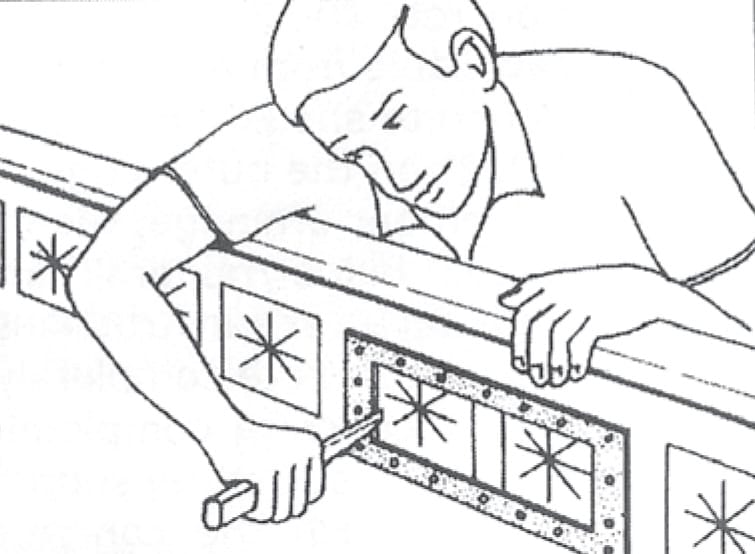
7. From the outside of the swimming pool kit, snap the liner bead into the liner track in each shallow-end corner (see Figure 23). Continue snapping the bead into the track across the shallow end of the swimming pool kit. Now, start down the long sides, toward the deep end. Several feet past the breakpoint, stop and square the vinyl pool liner over the break point, using the seam as a guide. When the swimming pool liner is square, continue snapping the bead into the track, being careful not to overstretch the vinyl liner. Push the vinyl liner bead into the liner track completely to insure proper locking.
8. After the vinyl liner bead is completely installed in the pool liner track, adjust the pool liner in the corners, as required, to achieve a smooth, loose fit in the corners. Do not stretch the pool liner tightly over inside corners. Make sure there is enough material in the shallow end to allow the pool liner to rest against the entire shallow-end wall containing the step with NO space between the pool liner and the step at the floor. The material needs to be flat against the step area. Place sand bags (you should have several for the across the entire shallow-end wall if necessary. The material in this area has to stay in place. The deep end of your replacement swimming pool liner has more material than the shallow. It is designed to stretch.
9. When the replacement swimming pool liner is positioned correctly, remove a small area of the liner bead from the liner track, close to the break point, and insert approximately 36″ of vacuum hose behind the liner. DO NOT ALLOW THE VACUUM HOSE TO TOUCH THE POOL FLOOR! Use duct tape to tape the hose in place and seal the opening around the hose to create a vacuum behind the pool liner. NOTE: Larger in-ground swimming pool kits may require two vacuums.
10. Turn on the vacuum(s). As suction starts to pull the replacement swimming pool liner down, continually adjust the fit by pulling the excess material on the floor toward the base of the pool kit walls. If you can’t get all the wrinkles out, shut off the vacuum(s), reposition the vinyl liner in the pool kit, turn the vacuum(s) back on and start the process again.
11. When the pool liner is pulled down snugly, with no wrinkles, you are ready to start installing the pool kit main drains. By feel, locate the screw holes in the top of the main drain, under the vinyl liner. With the gasket in place, screw the faceplate to the pool main drain, following the manufacturer’s instructions. CAREFULLY, use a razor knife to cut out the pool liner material INSIDE the main-drain frame and install the main-drain cover.
12. Using a standard garden hose, place the hose end in the hopper and start water flow. Once there is 1’ to 2’ of water in the bottom pool hopper, the remainder of the pool can be filled from the garden hose or a water truck. DO NOT ALLOW A STRONG STREAM OF WATER TO DIRECTLY HIT THE POOL BOTTOM.
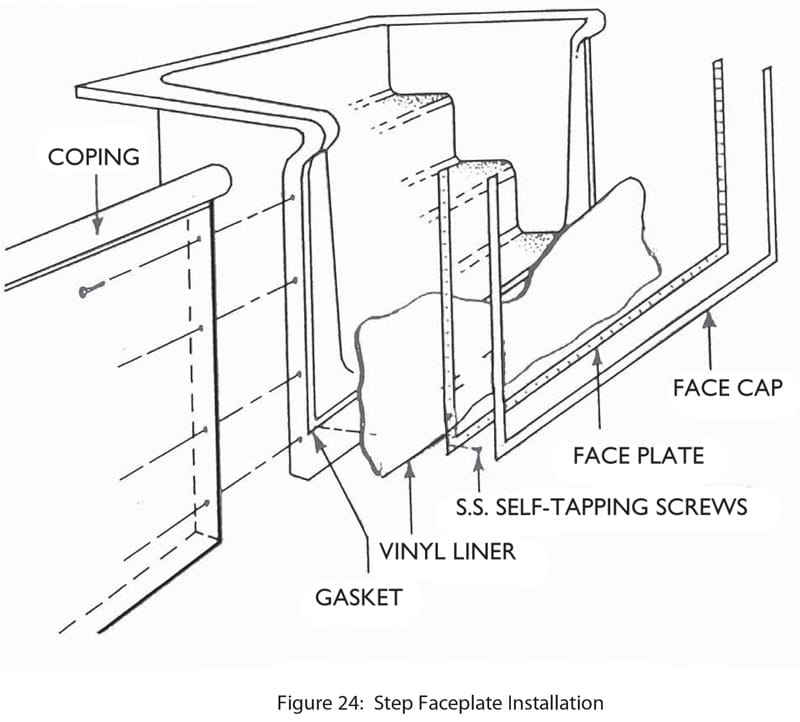
13. When the swimming pool kit water is 6″ deep in the shallow end, remove the vacuum(s) and the sand bags. Install the liner bead in the liner track. If pool steps are used, install the step faceplate now (see Figure 24).
14. When the pool water is at least 12″ to 18″ deep in the shallow end, locate the returns and the skimmer(s). Install the gaskets/faceplates, following the manufacturers’ instructions. Carefully, use a razor knife to cut out the vinyl liner material INSIDE the returns and skimmer(s).
15. DO NOT REMOVE THE VACUUM(S) WITH LESS THAN 6” OF WATER IN THE SHALLOW END AND DO NOT ALLOW THE VACUUM(S) TO RUN WITH MORE THAN 12″ OF WATER IN THE SHALLOW END. IF THE VACUUM(S) ARE SHUT OFF FOR ANY REASON BEFORE THE WATER IS 6″ DEEP IN THE SHALLOW END, THE WATER MUST ALSO BE SHUT OFF UNTIL THE VACUUM IS RESTORED.

Vinyl Replacement Swimming Pool Liner Installation Video
All Images & Content © PoolWarehouse.com
Jones
Pool Kit Specialist
[email protected]
Phone: 800-515-1747
www.poolwarehouse.com

