Ultimate Guide to DIY Inground Pool Dig Sheets: Master Your Excavation
Your dream pool starts with the perfect hole. Learn how to read your dig sheet, prepare your yard, and excavate like a pro—without the costly mistakes.
The Foundation of Your DIY Dream Pool
Taking on a DIY inground pool project is one of the most rewarding and cost-effective home improvements you can make. You’ve picked out the perfect pool shape, selected your liner, and ordered your kit. But before the steel or polymer walls go up, before the plumbing is laid, and long before you fill it with water, you have to face the most intimidating part of the project: the dig.
Excavating a massive hole in your backyard is daunting. It’s not just a matter of digging a square box; an inground pool requires precise slopes, specific depths, safety ledges, and exact perimeters. One wrong scoop with the excavator can lead to collapsed walls, ill-fitting liners, or the need to order expensive backfill materials.

Think of the dig sheet as the treasure map to your backyard oasis. It is a precise, engineered schematic that translates the 3D vision of your pool into a 2D set of instructions for your excavator. Whether you are renting a mini-excavator and doing it yourself, or handing the plans over to a local dirt-work contractor, understanding this document is the difference between a seamless installation and a DIY nightmare.
In this comprehensive guide, we are going to demystify the inground pool dig sheet. We’ll walk you through the anatomy of the plans, how to prep your yard, step-by-step excavation strategies, and the top mistakes you absolutely must avoid. Grab your hard hat, unroll your blueprints, and let’s get digging.
That is exactly why your Dig Sheet is the single most important document in your entire DIY pool kit.
Anatomy of a Pool Dig Sheet
At first glance, a dig sheet can look like a confusing jumble of lines, numbers, and angles. It looks like an engineering exam you didn’t study for. But once you understand the basic language of the document, it becomes incredibly straightforward.

The Plan View (Top-Down): This shows the pool footprint as if you were looking at it from a drone. It details the length, width, radius of the corners, and the perimeter.

The Profile View (Cross-Section): This shows the pool as if you sliced it in half like a cake. It details the depths, the slopes, and the transition from the shallow end to the deep end.
Here are the critical terms and measurements you will see on your customized dig sheet:

The Excavation Line vs. The Panel Line
This is the most common point of confusion for first-time DIYers. Your dig sheet will feature two distinct perimeters.
The Panel Line (or Finished Pool Line): This is the exact size of your finished pool. If you ordered a 16×32 rectangular pool, this line measures exactly 16 feet by 32 feet.
The Excavation Line (The Overdig): This is the line you actually dig to. It is usually 2 to 3 feet wider than the panel depending on the panel line you purchased and will be all the way around the pool.
The Overdig (Why You Dig a Bigger Hole)
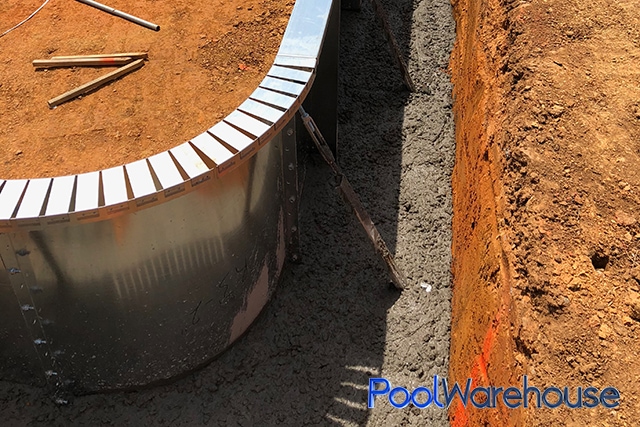
Why do we dig a hole bigger than the pool? The “overdig” provides a perfectly flat and level area around the perimeter of the pool. This space is absolutely vital. It gives you the physical room you need to stand outside the pool to bolt your steel or polymer wall panels together. It also provides space to install your A-frame braces, run your underground plumbing, and eventually pour your concrete collar (which locks the walls in place). If you ignore the overdig and dig exactly to the panel line, your pool kit will not fit in the hole.

Finished Depth vs. Dig Depth
Another critical distinction on your dig sheet is the depth.
Finished Depth: This is how deep the water will be once the liner is in and the pool is full.
Dig Depth: This is how deep you must excavate the dirt. The dig depth is always deeper than the finished depth because you must account for the thickness of your pool base (usually 2 inches of a vermiculite/cement mix or sand/cement mix). If your dig sheet calls for an 8-foot finished deep end, your dig depth might be 8 feet 2 inches. (For the shallow end, you’ll want to dig down to the same depth as your over-dig. When you apply the pool base, bring it 2 inches up the side of the panel—that’s what gives you your final finished depth.)
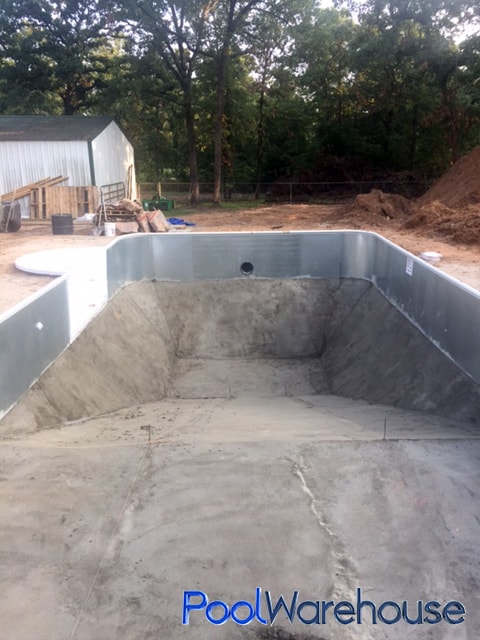
The Hopper (The Deep End)
The “hopper” is the industry term for the deepest part of the pool. It is called a hopper because it resembles the shape of a funnel or a grain hopper. It consists of a flat bottom pad surrounded by slopes that angle up toward the shallow end and the side walls.

Slopes and Transitions
Pool bottoms are never straight drop offs. They will always have some slope to support the pool walls. The dig sheet will clearly map out the slopes.
Side Slopes: The angles going from the deep end bottom up to the side walls.
Back Slope: The angle going from the deep end bottom up to the back wall.
The Transition Slope: The long, gradual incline that goes from the deep end hopper up to the flat shallow end. Your dig sheet will tell you exactly how far this slope extends horizontally and how many inches it drops vertically per foot.
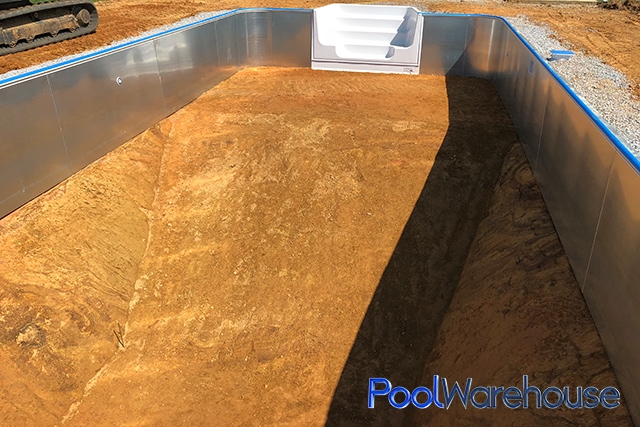
The Shallow End
This is the flat, upper level of the pool where you enter. While it is called “flat,” your dig sheet will ensure it is precisely leveled to accept your pool base perfectly. It will also indicate where any specialized entry systems, like fiberglass steps or a tanning ledge, will be located, as these require their own specific excavation footprints.
Pre-Dig Preparation
The success of your excavation is determined before the excavator even arrives. Proper preparation will save you hours of frustration and thousands of dollars in potential mistakes.
Step 1: Secure Your Permits and Call 811
Never skip the legal and safety steps. Ensure your pool permits are approved and visible. More importantly, dial 811 (or your local utility marking service) at least a week before you plan to dig. They will come to your property for free and mark any underground gas, water, electrical, or telecommunication lines. Hitting a gas line with an excavator is a life-threatening, bank-breaking disaster.
Step 3: The Art of Staking and Stringing
Using your dig sheet, you need to draw the pool on your lawn. Don’t just spray paint lines on the grass—the grass will be gone in the first ten minutes of digging.
- Batter Boards: Build wooden batter boards set well outside the excavation zone.
- String Lines: Run high-visibility mason’s line between the batter boards to represent the Panel Line (finished pool) and the Excavation Line (the overdig).
- Squaring the Pool: To ensure your pool is a perfect rectangle (and not a parallelogram), measure diagonally from corner to corner. If the two diagonal measurements are exactly the same, your pool is perfectly square.
- Marking Paint: Once squared, use inverted marking paint to spray the excavation line directly onto the ground. Paint the shallow end, the transition line, and the hopper pad.

Step 2: Establish a Benchmark
A benchmark is a fixed point of reference in your yard that will not move during the construction process. It dictates the final elevation of your pool deck. You will base all of your depth measurements off this single point. It could be a mark on your foundation, a sturdy wooden stake driven deeply into the ground, or your existing patio.
Step 4: Renting the Right Equipment
If you are DIYing the dig, you’ll need the right tools. A shovel won’t cut it.
- The Excavator: For most backyard pools, a medium-sized track excavator (around 10,000 to 18,000 lbs) is ideal. It’s powerful enough to move heavy dirt quickly but small enough to maneuver in a yard.
- The Skid Steer: You will need a skid steer (Bobcat) to move the excavated dirt from the pool area to your dump trucks or the designated spoil pile in your yard.
- The Laser Level: A transit or rotary laser level with a grading rod is non-negotiable. You cannot eyeball a pool dig. You will use the laser level constantly to check your depths against the dig sheet.
The Step-by-Step Excavation Process
You’ve studied your dig sheet, your yard is marked, and the equipment is fired up. It’s time to dig. While every pool shape is slightly different, the general sequence of a successful pool excavation follows these core steps.
Phase 1: Removing the Topsoil
Start by stripping the topsoil (usually the first 4 to 6 inches) off the entire excavation area. Topsoil is rich in organic matter and holds moisture; it is terrible for backfilling later because it compresses and settles. Strip it and move it to a separate pile to use for landscaping later, or haul it away.
Phase 2: Digging the Shallow End and Overdig Perimeter
Begin your main dig at the shallow end. Set your laser level receiver on your grading rod to the exact “Dig Depth” for the shallow end (referencing your benchmark).
- Excavate the entire footprint of the pool (including the deep end area) down to the shallow end depth.
- Pay close attention to the overdig perimeter. Ensure your walls are straight and plumb (vertical).
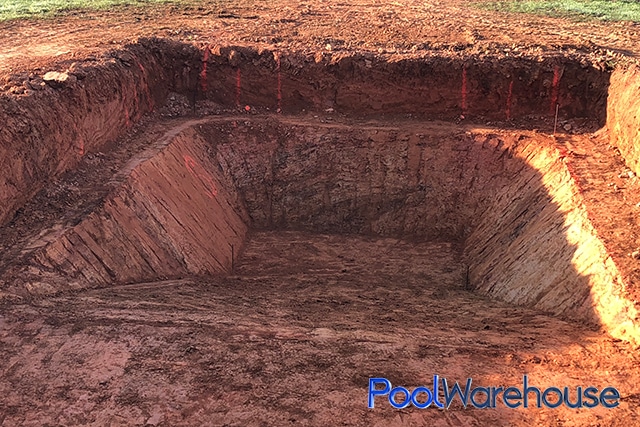
- By the end of this phase, you should have a massive, flat, shallow hole that matches the exact shape of your overdig lines.
Phase 3: Marking the Deep End (The Hopper)
Now that you are standing in a flat, shallow-end-depth hole, it’s time to map out the deep end. Grab your dig sheet and your marking paint. Measure from the edges of your newly dug overdig walls to locate the exact center pad of the hopper and the transition lines. Paint these directly onto the dirt floor.
Phase 4: Carving the Hopper and Slopes
This is where the artistry of excavation comes in.
- The Ramping Method: Move the excavator into the deep end area. Begin digging down to the final deep end “Dig Depth,” throwing the dirt up to the shallow end for the skid steer to haul away.
- Leave a Ramp: You must leave a ramp of dirt to drive the excavator out of the hole!
- Carving the Slopes: Use the bucket of the excavator to carve the back slope and side slopes as indicated on your dig sheet. Do not dig the slopes like a staircase; try to make them as smooth and continuous as possible.
- Checking, Checking, Checking: Have a partner constantly jumping into the hole with the laser level grading rod. Check the depth of the hopper pad. Check the angle of the slopes.
Phase 5: Backing Out and Hand Shaping
As you finish the hopper, slowly back the excavator up the transition slope, digging your ramp out as you go. Once the heavy machinery is out of the hole, the finesse work begins. You and your crew will need to get into the hole with flat hand-shovels to shave down high spots, define the crisp lines of the hopper, and ensure the overdig shelf is perfectly flat and ready to accept your wall panels.


Top 5 Costly Excavation Mistakes (And How to Avoid Them)
Even armed with the best dig sheet, mistakes happen in the dirt. Here are the most common pitfalls DIYers face and how you can prevent them.
Mistake 1: Over-Digging the Depth
The Problem: You get carried away with the excavator and dig the shallow end or the deep end hopper 6 inches deeper than the dig sheet specifies.
Why it’s bad: You cannot simply throw loose dirt back into the hole to raise the level. Loose dirt will settle over time, causing your pool floor to sink and your liner to wrinkle or tear.
The Fix: If you over-dig, you must bring the floor back up to the proper height using compacted crushed stone (gravel) or a lean concrete mix. This costs time and money.
Prevention: Dig slowly. Stop and check your depth with the laser level every few scoops as you get close to the final grade. Remember: It is always easier to hand-shovel away a high spot than it is to fix a low spot.
Mistake 2: Ignoring the Overdig Ledge
The Problem: Digging exactly to the size of the pool without leaving the 2-to-3-foot overdig shelf.
Why it’s bad: You won’t have room to install your wall panels, attach your A-frame braces, or pour your concrete footing.
Prevention: Trust your dig sheet. String your lines for the overdig and stick to them rigidly.
Mistake 3: Sloppy, Uneven Slopes
The Problem: The slopes leading to the deep end are jagged, uneven, or at the wrong angle.
Why it’s bad: Your pool liner is custom-manufactured to fit the exact angles on your dig sheet. If your slopes are wrong, the liner will either stretch dangerously tight (leading to premature tearing) or bag up with ugly wrinkles.
Prevention: Use a string line pulled tight from the shallow end to the bottom of the deep end to act as a visual guide for the transition slope. Take your time hand-shaping the dirt.
Mistake 4: Not Accounting for the Pool Base
The Problem: Digging the hole to the “Finished Depth” instead of the “Dig Depth.”
Why it’s bad: When you add your 2 inches of pool base (vermiculite or sand/cement), your pool will end up 2 inches too shallow, which can throw off the fit of your liner.
Prevention: Highlight the “Dig Depth” on your dig sheet before you start. Treat that number as gospel.
Mistake 5: Poor Water Management
The Problem: Digging the hole and leaving it unprotected while it rains for a week.
Why it’s bad: A freshly dug pool hole acts like a giant bathtub. Rain will wash the dirt from your carefully carved walls and slopes down into the hopper, turning it into a muddy soup and ruining your exact dimensions.
Prevention: Check the weather before you dig. Try to schedule your wall installation and concrete collar pour as soon as possible after the dig. If rain is expected, cover the slopes with heavy tarps and place a submersible pump in the deep end hopper to remove water quickly.
Why Our DIY Dig Sheets Make the Difference
Not all pool kits are created equal, and not all dig sheets are easy to read. At Pool Warehouse, we know that the success of your DIY build hinges on the clarity of your instructions.
When you purchase one of our DIY Inground Pool Kits, you aren’t just getting boxes of steel and plumbing. You receive a Custom-Engineered Dig Sheet tailored specifically to your exact pool dimensions, entry step choices, and liner profile.
What sets our dig sheets apart?
Idiot-Proof Clarity: We don’t clutter our pages with unnecessary engineering jargon. We use clear, bold numbers, color-coded lines, and distinct call-outs designed for the everyday homeowner.
Panel Line & Overdig Distinction: We visually separate the panel line from the overdig line so you always know exactly where to drop the excavator bucket.
Precise Step Excavation: Adding fiberglass roman steps or a steel tanning ledge? Your dig sheet will include the exact bump-out dimensions required to support your specific entry system.
The Pool Coach Support: Staring at your dig sheet and still feeling unsure? Your kit includes access to our dedicated Pool Coaches. Call us, text us a picture of your yard, and we will walk you through the measurements before you start digging.


Frequently Asked Questions (FAQ) About Pool Excavation
Ready to Break Ground?
Digging an inground pool is a massive undertaking, but with careful planning, the right equipment, and a meticulously crafted dig sheet, it is entirely within the grasp of a dedicated DIYer.
Take your time, trust your measurements, and don’t be afraid to ask for help when you need it. The moment you step back and look at that perfectly carved hole in the ground, you’ll know the hardest part is behind you—and your backyard oasis is well on its way to becoming a reality.
Start your journey today. Browse our selection of premium DIY Inground Pool Kits, complete with the industry’s most user-friendly dig sheets, and take control of your backyard transformation.

Building, maintaining, and upgrading your pool doesn’t have to be overwhelming. Inside the DIY Pool Academy, we break down the complex processes into simple, step-by-step lessons so you can tackle any project with confidence.


