Above Ground Pool Liner Installation Instructions
RECOMMENDED ITEMS FOR PROPER INSTALLATION
Items needed: screwdriver, sharp nail or ice pick, tamping tool, industrial vacuum or household vacuum with filter bag removed, utility knife, 2 inch gray duct tape with non-asphaltic adhesive, masking tape & garden hose.
Preparation Of Above Ground Pool Bottom
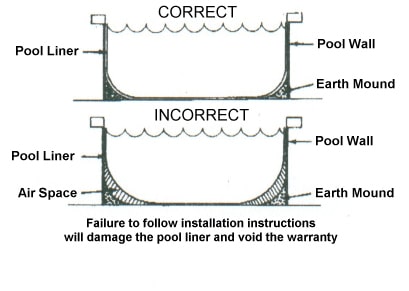
The pool liner IS NOT a structural part of the pool. Its function is to keep the water from leaking out of the pool. The water pressure is held by the pool wall and structural parts, not by the liner. The pool liner must be installed properly with all the areas touching the ground, earth mound, pool wall and not supporting the weight of the water, which will damage the above ground pool liner.
Slight wrinkles appearing during the installation of a pool liner is natural. This is caused by an over allowance of vinyl material to avoid damage to the linear if shrinkage should occur.
- Spread a 2” layer of brick sand over the entire pool foundation area inside the base rails. Use a rake to make the sand at and smooth. Tamp sand to help reduce foot prints. Instead of brick sand, you can use foam floor padding (Available when ordering your liner form Pool Warehouse). Cut the sheets to t and join them with duct tape along the entire length of each seam.
- With the brick sand, make a curved cove about 8” high and 8” wide all around the bottom of the pool wall on the inside. Pack firmly into shape. Pre-cast Styrofoam cove can also be used.
Above Ground Liner Installation
- Place the closed liner carton in the center of the pool
- Open the carton. To avoid damaging the liner, DO NOT use a knife or anything sharp to open the carton.
- Unpack and unfold the liner and spread it out in the sun to warm up.
- Inspect all seams for tears and surfaces for holes.
- Spread out liner. The curved seam should be centered on the cove at the base wall. The other seams will form straight lines across the bottom of the pool. If seams appear to have aps, check to see if correct side is up.
- Smooth out all wrinkles in the bottom. Smooth out the floor of the liner by pushing it toward the pool wall. A soft broom will be helpful. Never forcefully pull or drag the liner.
- If you have a beaded liner, refer to the “BEADED LINER INSTALLATION” section.
- Lift the sides of the liner and drape over the top of the pool wall.
- Refer to “OPTIONAL STEP TO ELIMINATE WRINKLES” section or continue with STEP 11.
- Start lling the pool with water. As the pool lls, work out wrinkles and smooth liner to the walls. Remove the plastic coping around the top edge of the wall one piece at a time and adjust the liner. Keep smoothing out the wrinkles.
- Do not install face plates, inlets, light fixtures, etc. until water reaches 3” below each opening. Premature installation might result in the liner tearing away from the opening due to stretching as the water level increases!
- Proceed filing pool until water reaches desired level.
DO NOT STRETCH YOUR LINER! THIS WILL AUTOMATICALLY VOID THE WARRANTY.
Beaded Above Ground Pool Liner Installation
- Fasten the liner in place (THIS STEP APPLIES TO BEADED LINER INSTALLATION ONLY!).
- Lift the sides of the liner and insert the beaded edge into the liner retainer on THE TOP EDGE.
- Continue with STEP 10.
Optional Step To Eliminate Wrinkles
- To remove air (which causes wrinkles) from behind the liner, insert a vacuum cleaner hose through the skimmer hole in the pool wall behind the liner from the outside of the pool. For the most e cient air removal, seal the area around the hose and the skimmer hole using cardboard and masking tape.
- Turn vacuum cleaner on. While vacuum is running, you should be adjusting the liner with short tugs to eliminate wrinkles. If you have trouble shifting the liner into position, shut vacuum o for a few minutes. You should then be able to adjust the problem area before continuing with the vacuum suction.
- Start filling the pool with water. The vacuum cleaner should continue to run until water level nears the top. Make sure to keep vacuum cleaner hose above the water level at all times.
- Continue with STEP 12.
ATTENTION HOME OWNER: BE SURE TO ATTACH DO NOT DIVE STICKER TO YOUR LINER TWO INCHES ABOVE THE WATER LEVEL SO IT IS CLEARLY VISIBLE.
To Download a printable PDF of this guide click here: Above Ground Pool Liner Installation Guide
Above Ground Pool Liner Installation Instructions
Feel free to give us a call at +1 (800) 515-1747 or send an email to, [email protected] if you have questions – make sure to leave a message when calling after hours and we will return your call no later than the next business day!
At Pool Warehouse, We Know Swimming Pool Kits!

